Software Information
| POP3: pop.gmail.com (SSL; Port 995), IMAP: imap.gmail.com (SSL; Port 993) | |
| smtp.gmail.com (SSL; Port 465 oder 587) | |
| This email address is being protected from spambots. You need JavaScript enabled to view it. | |
| Verwendet SMTP-Authentifizierung. Sie müssen in Ihrem Account den POP3- und SMTP-Zugriff zunächst aktivieren. POP3, IMAP und SMTP laufen über SSL-Verschlüsselung. |
| imap.bluewin.ch (IMAP) | |
| smtpauth.bluewin.ch (Port 587) | |
| E-Mail-Adresse | |
| Verwendet SMTP-Authentifizierung. |
GMX per POP3 abrufen
GMX Mail App
Ihr E-Mail-Postfach immer dabei!
Mit der GMX Mail App haben Sie unterwegs Zugriff auf Ihr Postfach und Ihre Kontakte. Die GMX Mail App ist für iPhone, iPad und Android kostenfrei erhältlich:
Nach dem Download loggen Sie sich einfach mit Nutzernamen und Passwort ein und schon können Sie unterwegs E-Mails schreiben, abrufen und beantworten.
Serverdaten
POP3 steht für die englische Abkürzung "Post Office Protocol Version 3". Per POP3 werden E-Mails von einem Server in ein E-Mail-Programm übertragen und gleichzeitig vom jeweiligen Server gelöscht.
Posteingang:
Server: pop.gmx.net
Port: 995
Verschlüsselung: SSL-Verschlüsselung
(Steht in einem Programm "SSL" nicht zur Verfügung, genügt es, die Option "Verschlüsselung" zu aktivieren.)
Postausgang:
Server: mail.gmx.net
Port: 587
Verschlüsselung: STARTTLS
Steht in einem Programm "STARTTLS" nicht zur Verfügung, nutzen Sie bitte das Protokoll "TLS". Existiert auch hierfür keine Option, genügt es, die Option "Verschlüsselung" zu aktivieren. Alternativ können Sie für den Postausgangsserver auch Port 465 mit der Verschlüsselung "SSL" nutzen.
Source: https://hilfe.gmx.net/
Add a commentWindows Sysinternals - Autoruns for Windows v13.51
Quelle/Source
- download at Autoruns for Windows v13.51
Windows Sysinternals - Process Explorer v16.1
Source/Quelle:
- for download Process Explorer v16.1
Add a comment
Windows 7: KB3AIK_EN.iso how to delete
Windows® Automated Installation Kit (AIK) für Windows® 7
Quellen:
- uninstall infos
- answers.microsoft.com Add a comment
https your homepage with - letsencrypt
Source / Quellen:
- sjau - Let's Encrypt 2 ISPConfig
-
-
-
-
-
-
-
Add a comment
Storage Unit for Proxmox with FreeNas
| Rack: NORCO Black 2U Rackmount Chassis, Model RPC-230 | ||
| Power Supply: Antec Basiq BP430 Power Supply | ||
| motherboard: Asus AT5NM10T-I | ||
| RAM: | more would be better | |
| HD: 4 x 2TB | ||
| USB FlashDrive: | for FreeNas | |
Inspired by Bernardo's Tech Blog
Add a commentZiel: diverse Private IP Adressen durch eine Singel Public IP Adresse zu erreichen.
Singel Public IP
Multi Container
Multi Domaine
Multi Subdomaine
| Proxmox | sollte bereits Installiert sein | |
| openVZ Container | Ubuntu-14.04-x86_64-minimal 25GB Disk 2GB RAM |
|
| NAT Config |
- Running Proxmox behind a single IP address - VM-firewall - Virtualization firewall - Linux-Praxisbuch: Linux-Firewall mit IP-Tables - - |
======
Vorschläge für eine saubere Installation .....
- -
Proxmox openVZ
Ubuntu 14.04 / 175GB / 4GB
The Perfect Server – Ubuntu 14.04 (Apache2, BIND, Dovecot, ISPConfig 3)
punkt 10
service apparmor stop
gibt es nicht
Punkt 12
service sendmail stop
gibt es nicht
punkt16:
| root@3ct03:~# mount -o remount / mount: permission denied |
Add a comment
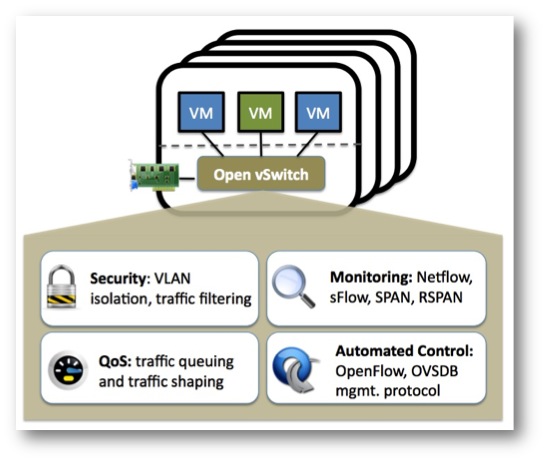
OpenVSwitch Installation in a Proxmox Installation

1. install openvswitch - important: /etc/apt/sources.list must contain "deb http://download.proxmox.com/debian wheezy pvetest"
2. apt-get install openvswitch-switch
Following steps by WEB-GUI:
3. If you continue using existing physical NICs at host and IP address: remove IP-address and ports from vmbr0
4. create an ovs bridge e.g. vmbr1(no ports for the moment) and assign the desired IP address, probably 192.168.1.12, activate autostart too
5. create an ovs bond with slaves eth0 eth1 (I suppose) and select as bridge vmbr1
6. assign the virtual NICs in the VMs to vmbr1
7. reboot
You can verify after reboot the proper configuration by
Code: ovs-vsctl show
should show your configuration (bridge, ports), version must be 2.0.90 or higher
Quelle: forum.proxmox.com
Add a commentSubcategories
Windows Article Count: 5
Perfect Article Count: 236
Android Article Count: 220
virtualisierung Article Count: 10
Firewall Article Count: 12
- Anker 575 USB-C Docking Station (13-in-1), 85W für Laptops
- Perfect Server Hardware for Virtualization | Proxmox | pve-05
- Pioneer Blu-Ray/BD/DVD/CD Reader/writer USB 3.0 BDR-XD07TB | WORKS OK with Debian 11
- NOT WORKING WITH DEBIAN 11 | Dockingstation | IcyBox 14-in-1 USB Type-C | IB-DK2262AC
- How to remove systemd services
- Laptop | Lenovo | Thinkpad E15 Gen3 AMD
- Laptop | Lenovo | LENOVO-IDEA IdeaPad 3 15IGL05 Notebook (15.6 ", 128 GB SSD, Business Black)
- D. Klimo | Kent monoblocks
- TTN Mapper
- LILYGO TTGO T-Beam V1.1 ESP32 LoRa 868Mhz GPS 18650 Board
- LILYGO® TTGO T-Beam 868MHz -> The Things Network (TTN/TTS) -> Karte | Infos und Video bei Alex (www.aeq-web.com)
- Kabelfarben 3.3V, 5V, 12V, 230V | Durchmesser
- 01 Digi-Bee Stand01 Wetter
- Solar Panel | 6V 3W Solar Panel JY D145x145
- TTGO LoRa32 V2.1_1.6 version 433/868/915Mhz ESP32 LoRa OLED 0.96 Inch SD Card Bluetooth WIFI wireless Module ESP-32 SMA
- -pve-04 | Disk SSD and HDD
- DISK SSD | 1 TB | Samsung SSD 870 EVO 1TB - 1TB
- NanoVNA V2
- CubeSat | antennas |
- KoZo_GS3_433MHz
- tinyGS - shortcut what it means
- TinyGS Telegram community | published Links
- Wolfgang W. Osterhage (Springer Verlag Sachbuch 2021): Die Geschichte der Raumfahrt | (gefundene Fehler)
- ucs Univention some commands
- SMA-Stecker / SMA-Buchse

 Drei Sicherheitslücken bedrohen verschiedene Druckermodelle von Lexmark – eine wird als kritisch eingestuft.
 Die quelloffene Kollaborationsplattform La Suite Docs ist in Version 4.5.0 erschienen. Sie bringt unter anderem eine bessere Importfunktion für Word.
 In Ivantis Endpoint Manager Mobile klaffen zwei kritische Sicherheitslecks. Angriffe laufen, Admins sollten schnell updaten.


