Hardware Information
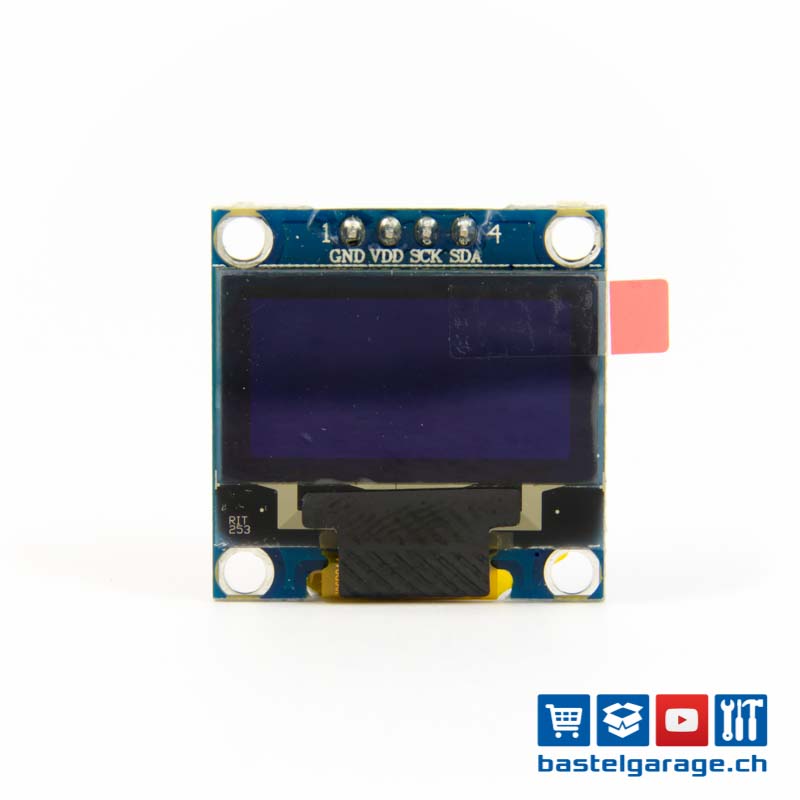
4 Pin OLED Display (COG+PCB) 0.96", 128x64
Model No. WEA012864D-03
►Type: Graphic
►Structure: COG+PCB
►Size: 0.96"
►128 x 64 Dot Matrix
►Built-in controller SSD1306
►3V/5V Power supply
►1/64 duty
►Interface: I2C
►4 Pin OLED Display
►Display Color: White / Yellow / Blue
DESCRIPTION
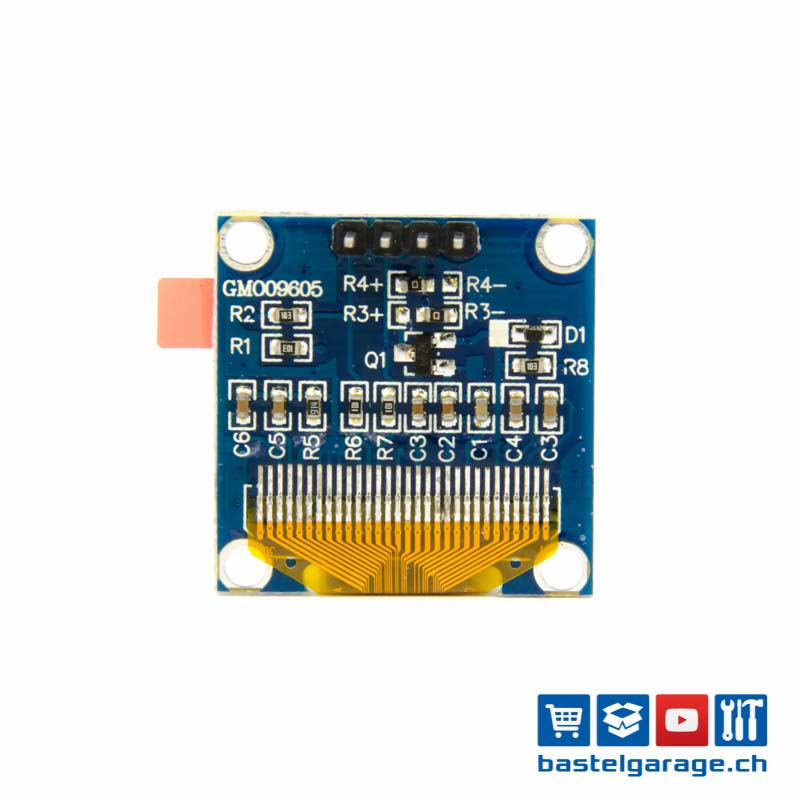
WEA012864D-03 version 4 pin OLED display module is a diagonal size 0.96 inch COG OLED display with PCB board on it. This WEA012864D-03 version OLED display is made of 128x64 pixels. WEA012864D-03 module is built in with SSD1306BZ IC, it communicates via I2C interface only, VCC 3V /5V, I/O level 5V to 3V, with conversion circuit, 1/64 duty cycle. The WEA012864D-03 model is having a smaller PCB than WEA012864D-01 version of which outline size is 27.3x27.3x2.37mm with mounting holes on board and 4 metal pins on module.
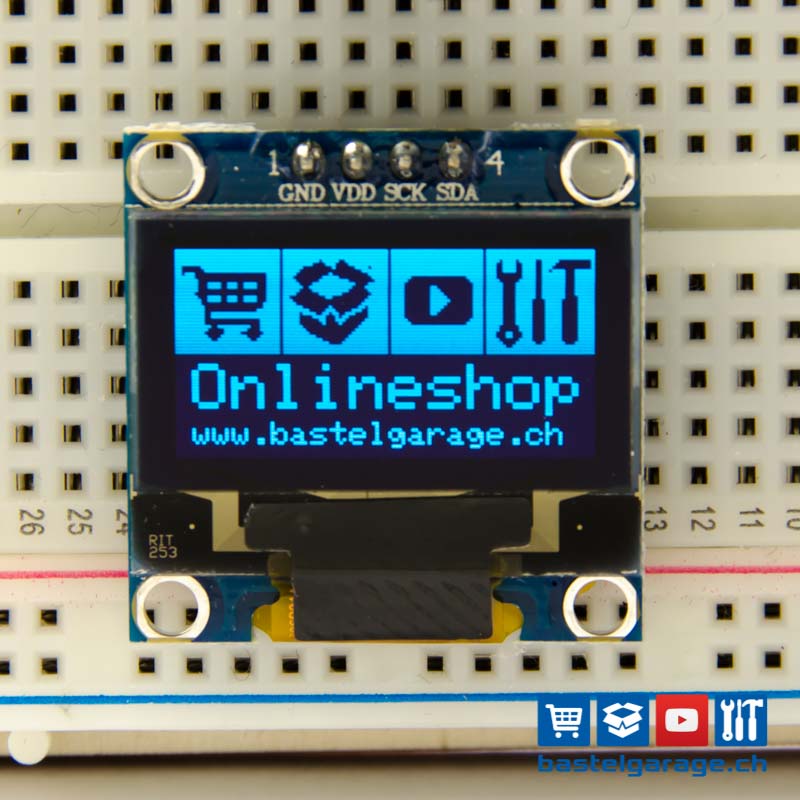
This 0.96 inch OLED module is suitable for smart control, industrial control, smart home application, medical device, etc. WEA012864D-03 module can be operating at temperatures from -40℃ to +80℃; its storage temperatures range from -40℃ to +85℃.
SPECIFICATIONS
Interface Pin Function
| No. | Symbol | Function |
|---|---|---|
| 1 | VCC | Power supply input: 2.8 – 5.2V |
| 2 | GND | Ground |
| 3 | SCL | The serial clock input. |
| 4 | SDA | The serial data input/output. |
Mechanical Data
| Item | Dimension | Unit |
|---|---|---|
| Dot Matrix | 128 × 64 | Dots |
| Module dimension | 27.30 × 27.30 × 2.37 | mm |
| Active Area | 21.74 × 10.86 | mm |
| Pixel Size | 0.148 × 0.148 | mm |
| Pixel Pitch | 0.17 × 0.17 | mm |
| Display Mode | Passive Matrix | |
| Display Color | Monochrome | |
| Drive Duty | 1/64 Duty | |
| IC | SSD1306 | |
| Interface | I2C | |
| Size | 0.96 inch | |
Absolute Maximum Ratings
| Parameter | Symbol | Min | Max | Unit |
|---|---|---|---|---|
| Supply Voltage for Logic | VCC | 1.65 | 5.5 | V |
| Operating Temperature | TOP | -40 | +80 | °C |
| Storage Temperature | TSTG | -40 | +85 | °C |
Electronical Characteristics
| Item | Symbol | Condition | Min | Typ | Max | Unit |
|---|---|---|---|---|---|---|
| Supply Voltage for Logic | VCC | - | 2.8 | 3.3 | 5.2 | V |
| Input High Volt. | VIH | - | 0.8×VCC | - | VCC | V |
| Input Low Volt. | VIL | - | 0 | - | 0.2×VCC | V |
| Output High Volt. | VOH | - | 0.9×VCC | - | VCC | V |
| Output Low Volt. | VOL | - | 0 | - | 0.1×VCC | V |
| 50% Check Board operating Current | ICC | Vcc=3.3V | - | 12.0 | 20.0 | mA |
Search keyword: 128x64 oled, oled 128x64, 0.96 oled, 0.96" oled, 0.96 inch oled, oled 0.96, oled 0.96"
Source/Quellen:
- https://www.winstar.com.tw/products/oled-module/graphic-oled-display/4-pin-oled.html
-
-
-
-
HIFIBERRY AMP2
Add a commentFull specs
The HiFiBerry DAC/DAC+ is a high-resolution digital-to-analog converter for the Raspberry Pi. It’s available for every Raspberry Pi Model—just pick the right board that matches the motherboard you want to use.
- Directly powered from the Raspberry Pi—no additional power supply
- Ultra-low-noise voltage regulator for optimal audio performance
- Available with different output connectors: RCA or 3.5mm phone jack (DAC+ Light and Pro only available with RCA jacks)
For HiFiBerry DAC/ DAC+ standard and DAC+ pro:
- Dedicated 192kHz/24bit high-quality Burr-Brown DAC for best sound quality (ESS instead of Burr-Brown on DAC+ Light)
- Hardware volume control—you can control the output volume using “alsamixer” or any application that supports ALSA mixer controls (not available on DAC+ Light)
For HiFiBerry DAC+ light/ DAC+ standard and DAC+ pro:
- Connects directly to the Raspberry Pi—no additional cables needed
- Comes as a pre-fabricated kit mounted in less than a minute—you just plug it onto the Raspberry Pi B+ (no soldering necessary)
- Compatible with all Raspberry Pi’s with the 40-pin connector (Raspberry Pi B+/2/3/Zero)
- Integrated EEPROM for automatic configuration (not DAC+ Light)
- The board conforms to the Raspberry Pi hardware-attached-on-top (HAT) specification.
- Comes with all components required to mount it—the spacers are included when you buy the board
DAC+ Pro advanced features:
- Gold-plated connectors: Gold-plated RCA connectors ensure optimal connection to your RCA cables.
- Dual-domain clock circuit: The DAC+ Pro uses its own on-board low-jitter clock generator. To have the lowest jitter values, there are 2 different clocks on board: one for 44.1/88.2/176.4 kHz sample rates and another for 48/96/192kHz.
- Hackable: The board can be modified to allow external power supply for the analog part of the board. Also you can connect external I2S DACs. These features need soldering on the board. This will void warranty, but real hardware hackers have no problems with this.
Quellen/Source:
- hifiberry | dacplus
-
-
-
-
- Add a comment
| credentials.h |
|
| your sketch, you add: |
|
Arduino Uno | Arduino Starter Kit
The Starter Kit includes:
1 Projects Book (170 pages),
1 Arduino Uno,
1 USB cable,
1 Breadboard 400 points,
70Solid core jumper wires,
1 Easy-to-assemble wooden base,
1 9v battery snap,
1 Stranded jumper wires (black),
1 Stranded jumper wires (red),
6 Phototransistor,
3 Potentiometer 10kOhms,
10 Pushbuttons,
1 Temperature sensor [TMP36],
1 Tilt sensor,
1 alphanumeric LCD (16x2 characters),
1 LED (bright white),
1 LED (RGB),
8 LEDs (red),
8 LEDs (green),
8 LEDs (yellow),
3 LEDs (blue),
1 Small DC motor 6/9V,
1 Small servo motor,
1 Piezo capsule [PKM17EPP-4001-B0],
1 H-bridge motor driver [L293D],
1 Optocouplers [4N35],
2 Mosfet transistors [IRF520],
5 Capacitors 100uF,
5 Diodes [1N4007],
3 Transparent gels (red, green, blue),
1 Male pins strip (40x1),
20 Resistors 220 Ohms,
5 Resistors 560 Ohms,
5 Resistors 1 kOhms,
5 Resistors 4.7 kOhms,
20 Resistors 10 kOhms,
5 Resistors 1 MOhms,
5 Resistors 10 MOhms
Quellen/Source:
- arduino.cc/genuino-starter-kit
-
-
-
-
-
| DHT22 (DHT-22) AM2302 | Temperatur und Luftfeuchtigkeitssensor | #include "DHTesp.h" | github.com |
| DS18B20 | Temperature Sensor | ||
| BME280 | Temperature, Humidity and Pressure Sensor | ||
| BME680 | Breakout Luftfeuchtigkeits-, Druck-, Temperatur- & Luftgütesensor | ||
| TMP36 | Low Voltage Temperature Sensors | tmp36 | |
| SX1278 | LoRa Transceiver Module | ||
| RFM95 | LoRa Transceiver Module | ||
| MT3339 | is an All-in-One GPS system on a chip (SoC). | ||
| LM393 | - Main chip: LM393, carbon dioxide gas sensing probe - MG811 CO2 Carbon Dioxide Gas Sensor Module |
||
| HC-SR501 | PIR Motion Sensor | ||
| DS18B20 | |||
| HC-06 | Bluetooth Module | ||
| YL-69 or HL-69 | Soil Moisture | ||
| DS1307 | RTC Module | ||
| HC-SR04 | Ultrasonic Sensor | ||
| LDR (Photoresistor) | |||
| nRF24L01 | nRF24L01 / 2.4GHz RF | ||
| TSOP4838 | IR Receiver | ||
| BMP180 | Barometric Sensor | ||
| YL-83 | Rain Sensor | ||
| CC2538 | Zigbee - Texas Instruments | ||
| NEO-6M | GPS Modul | ||
| MAX30102 | MAX30102 High-Sensitivity Pulse Oximeter and Heart-Rate | ||
| ltc4150 | Batterie-Management Coulomb Counter | ||
| INA219 | Zerø-Drift, Bidirectional Current/Power Monitor With I2C Interface | ||
| LM2596 | Power Modul | ||
| USB 3 Breakout Board Type A | |||
| DC Power Jack | |||
| CSR8645 | Bluetooth Audio Module | ||
Quellen/Source:
-
-
-
-
-
-
-
-
-
- Add a comment
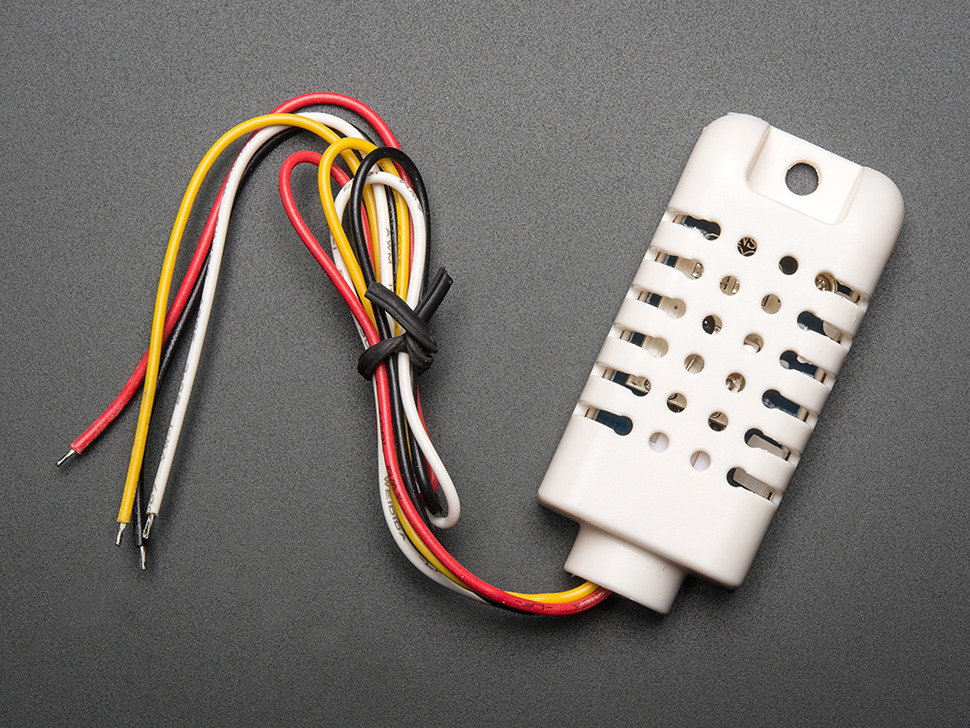
AM2302 (wired DHT22) temperature-humidity sensor
Dokumente:![]() Digital_humidity_and_temperature_sensor_AM2302.pdf406.57 KB
Digital_humidity_and_temperature_sensor_AM2302.pdf406.57 KB![]() AM23021.pdf570.47 KB
AM23021.pdf570.47 KB
Picture:
Quellen/Source:
- DHT11 & DHT22 Sensors Temperature and Humidity Tutorial using Arduino
- Class for DHTxx sensors (xx = 11-21-22-33-44)
-
-
-
-
-
Ich habe
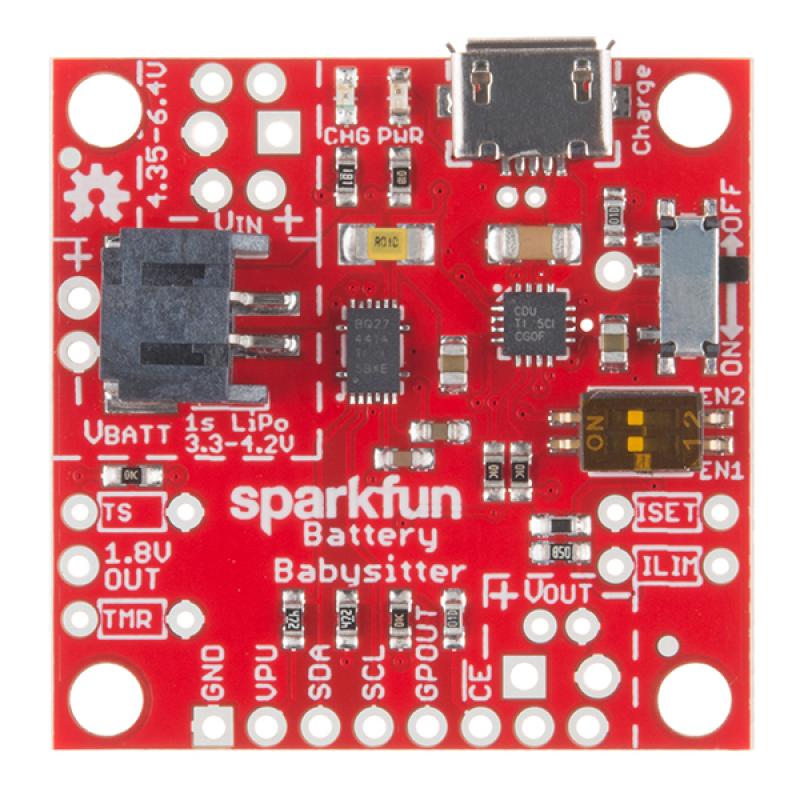
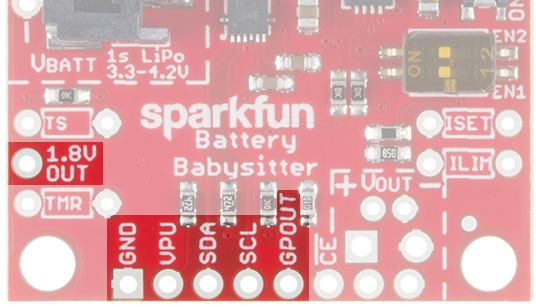
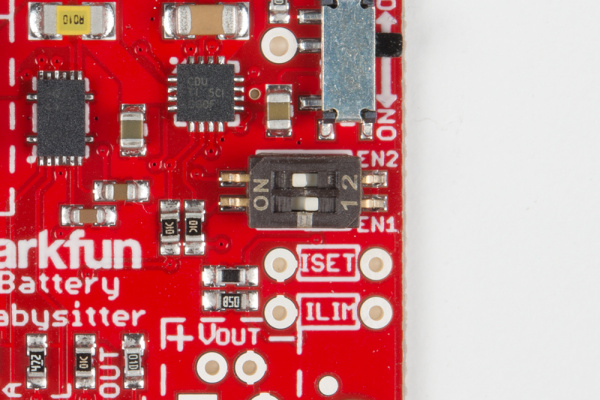
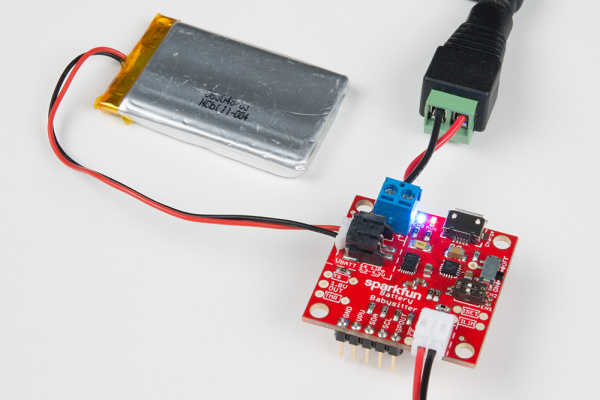
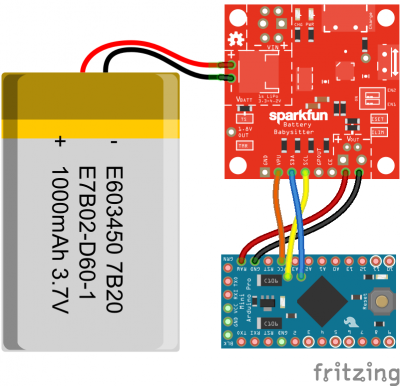
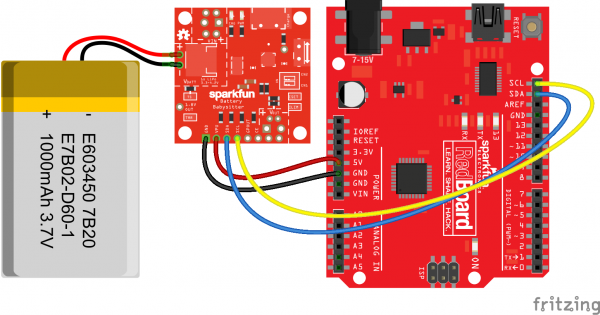
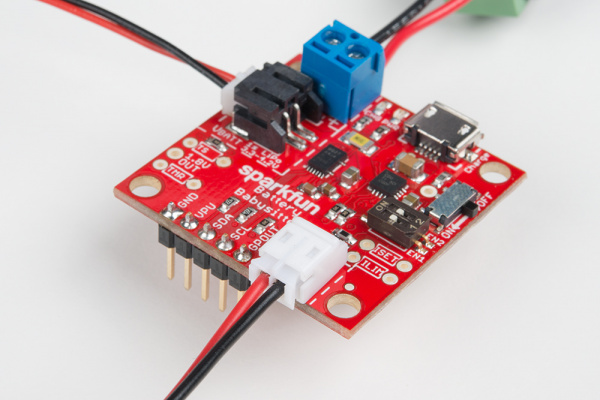
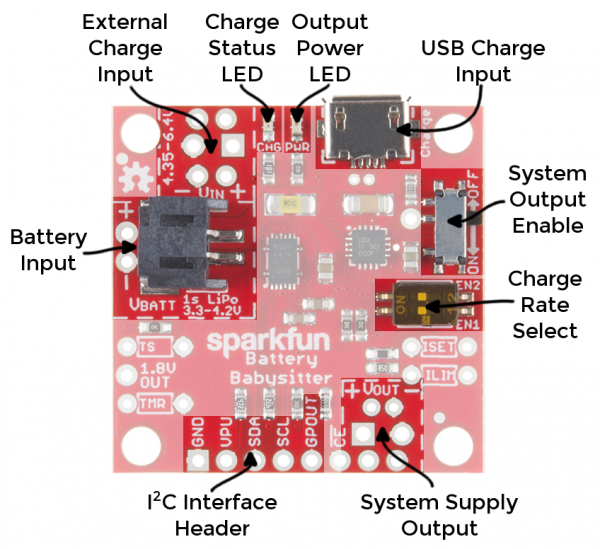
- SparkFun LiPo Battery Manager - Battery Babysitter (Artikelnr. 420663)
- Budget Solar Set 2W mit Laderegler für Lipo Akku (Artikelnr. 420391)
- Liter Energy battery 3.7V 1500mAh JST 2.0 / Lithium Ion Polymer (Artikelnr. 420334)
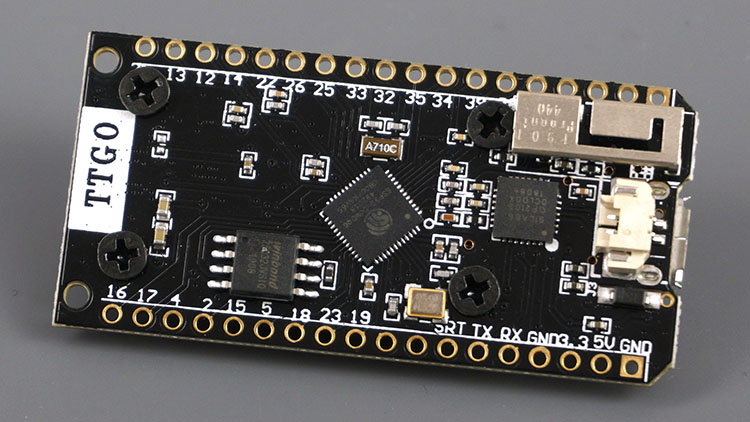
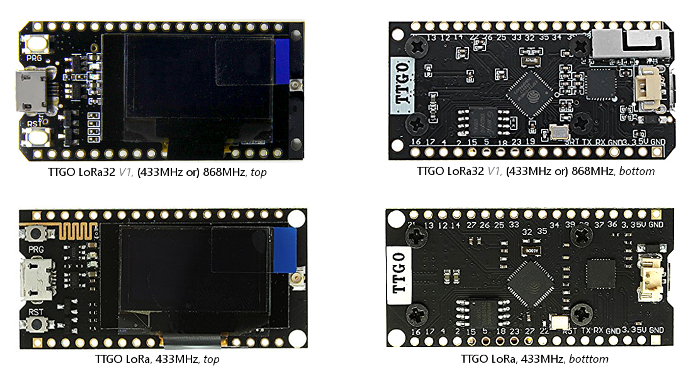
- 2 Stück LILYGO® TTGO LORA32 868 Mhz ESP32 LoRa OLED 0,96 Zoll Blaues Display Bluetooth WIFI ESP-32 Entwicklungsboard Modul Mit Antenne
Idee
Solarzelle via (420391) Solar IN BAT_OUT würde auf Batteriemanager (420663) gehen, Oben rechts beim Vin 4.35-6.4V!
Batterymanager
VBatt die LiPo anschliessen
Vout (unten rechts) den TTGO LoRa
Müsste das so klappen?
Dann
Battery Manager (420663) - Auf TTGO LoRa
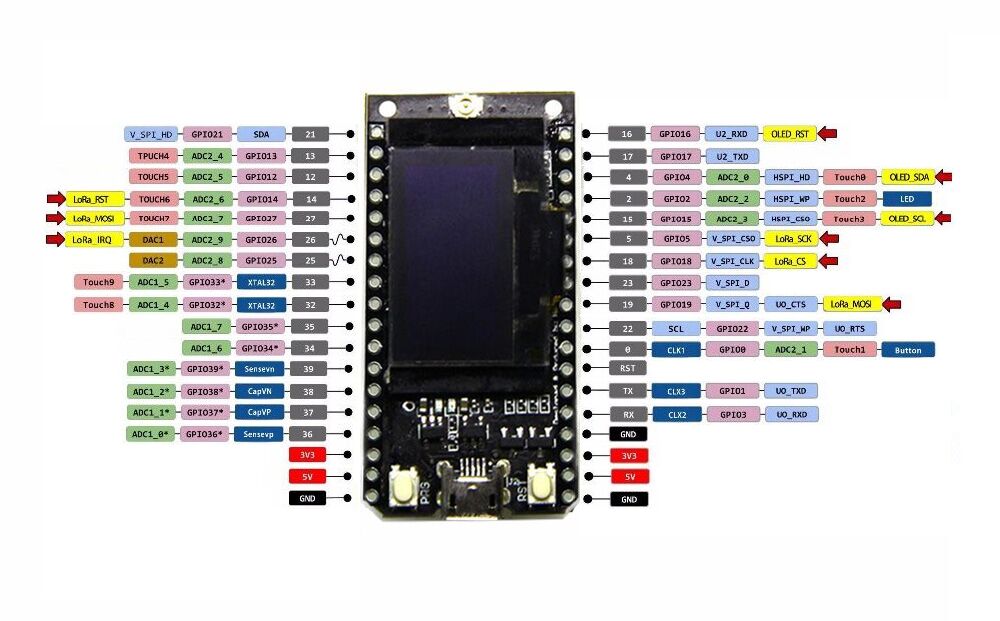
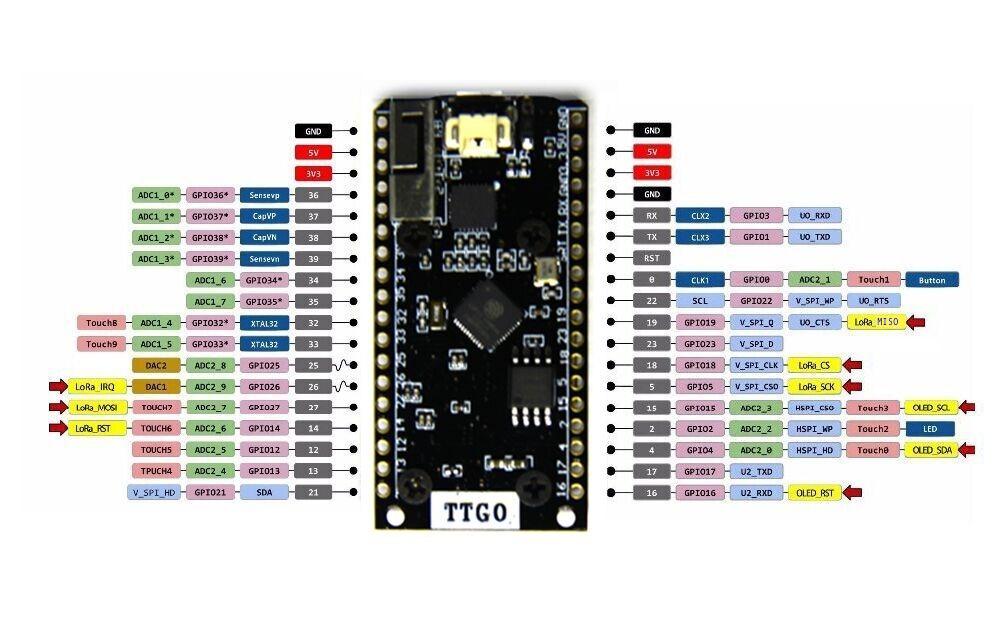
SDA -> Pin 21
SCL -> Pin 22
GDN -> Pin GDN
VPV -> Pin 3.5
Bilder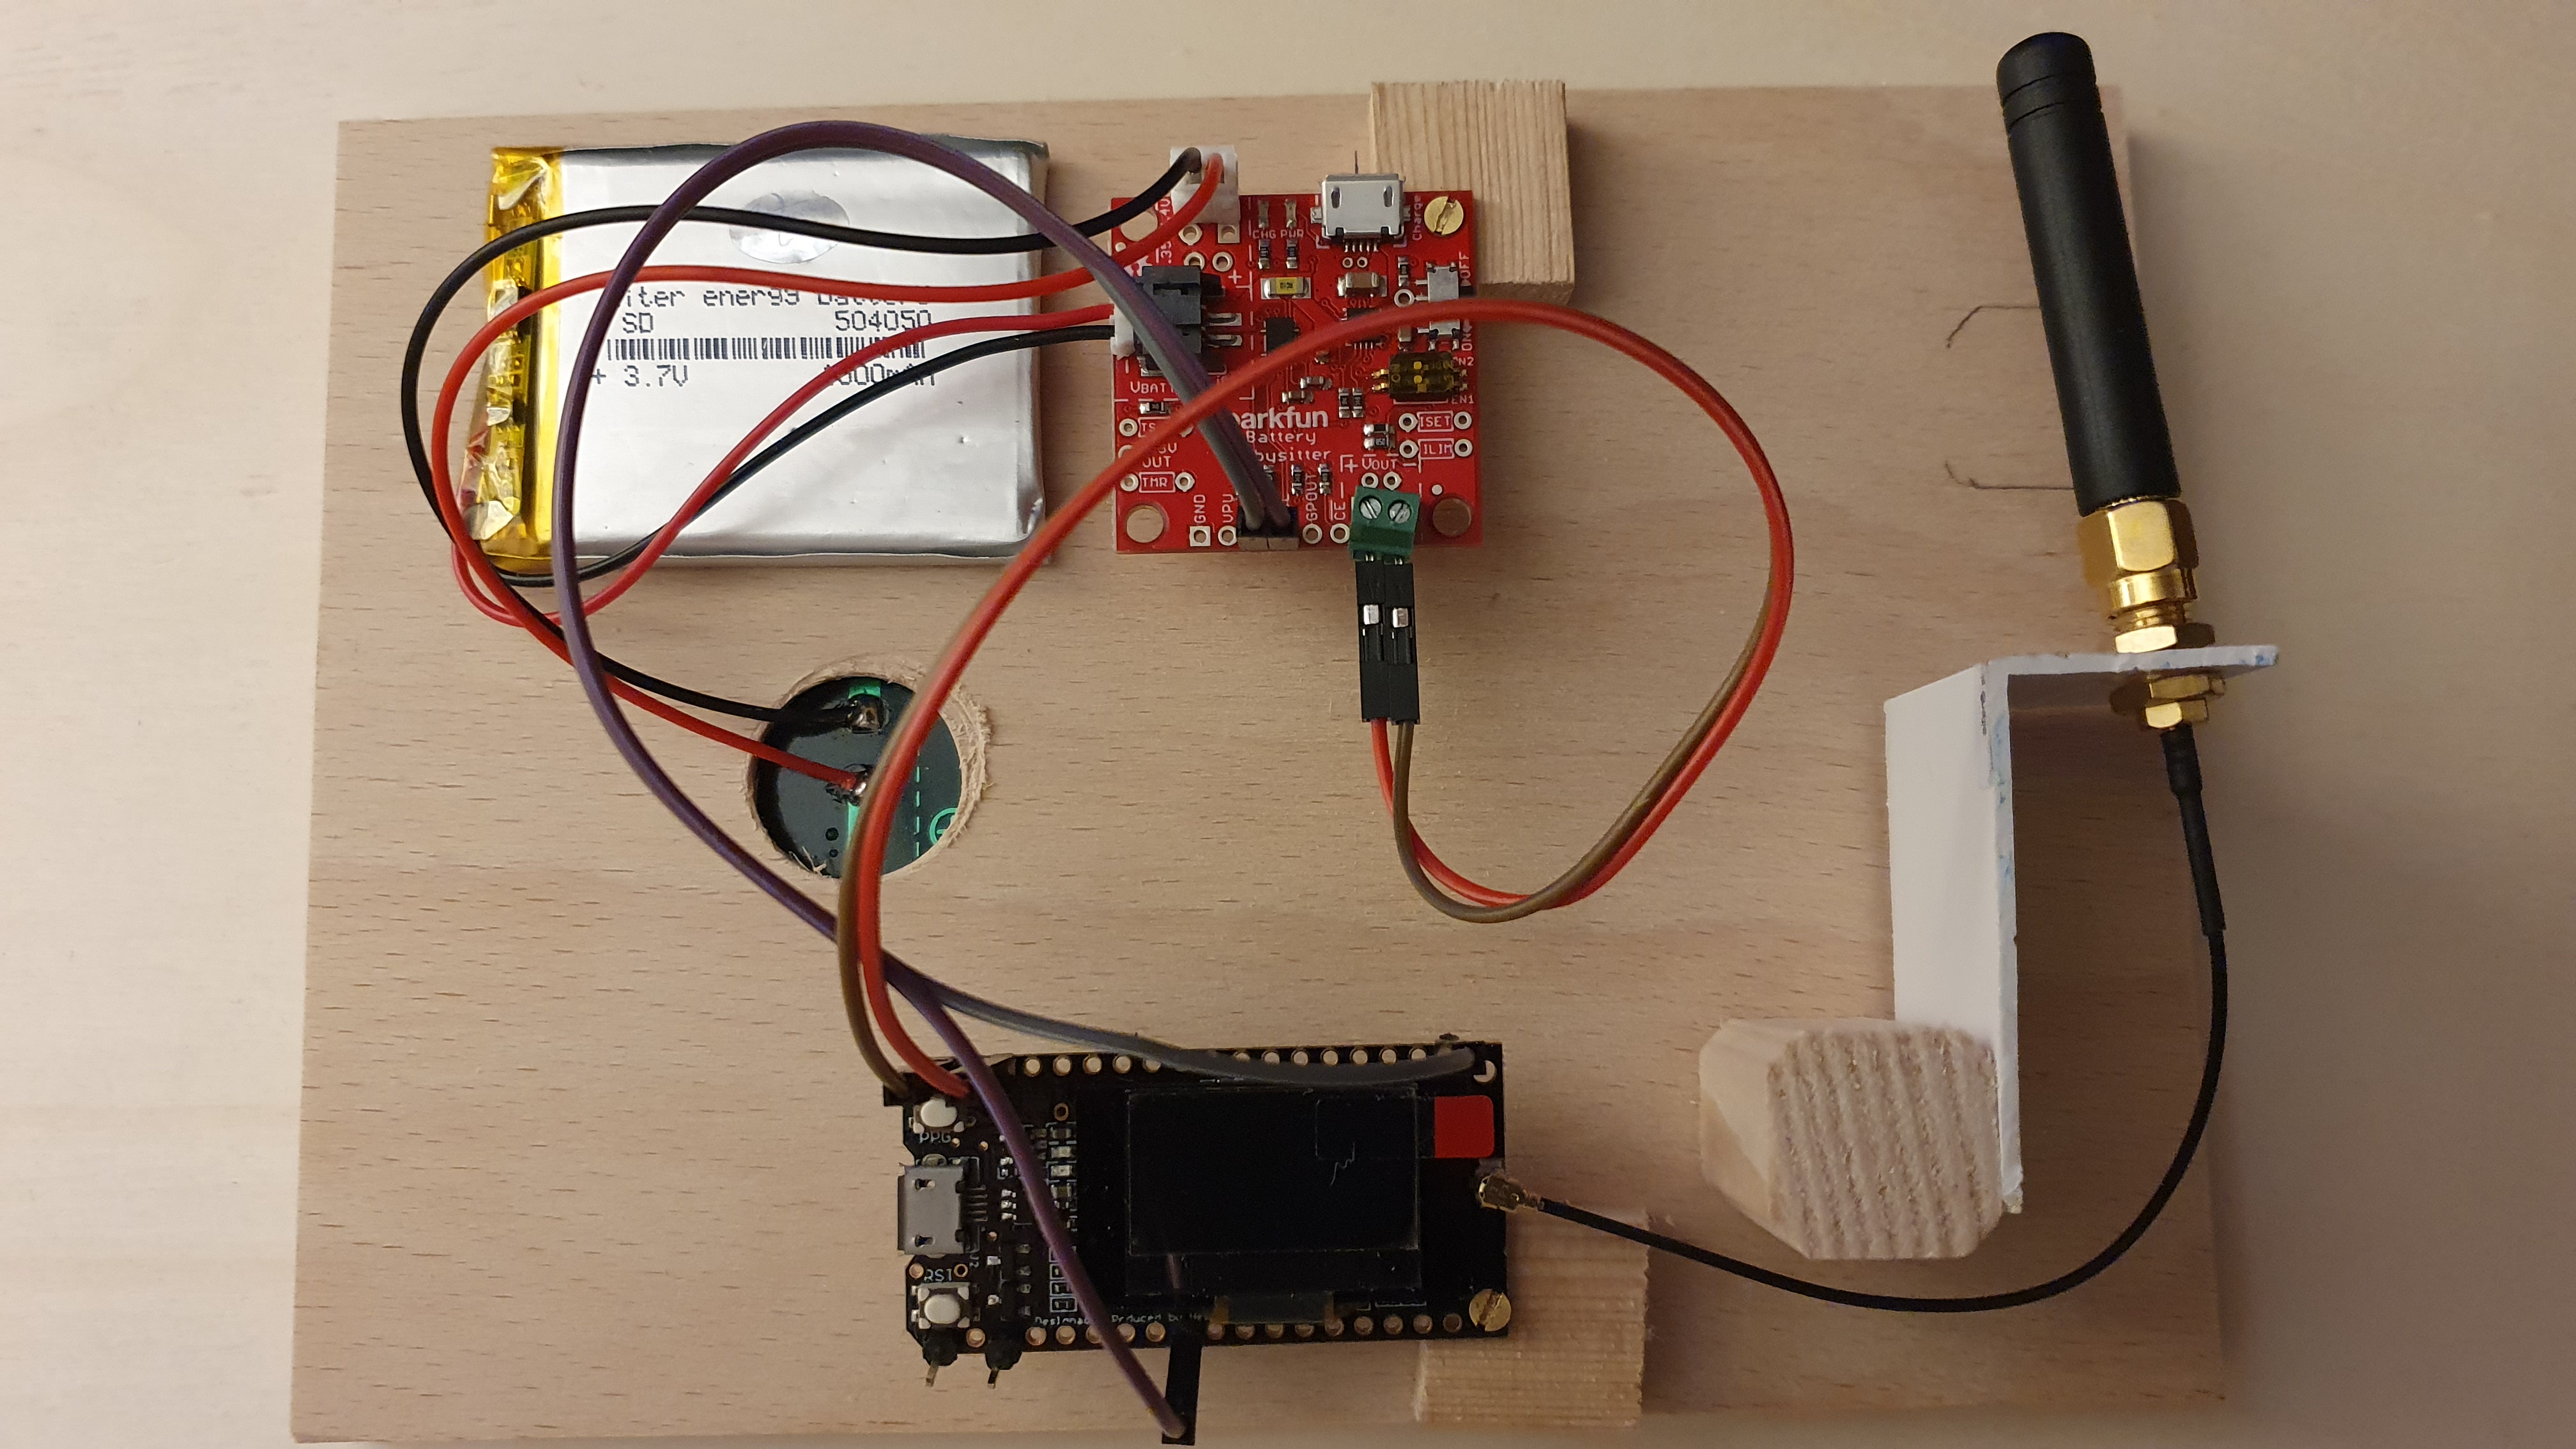


Quellen/Source:
- ttn | the things network | open LoRaWAN™ network
- Forum --> ttn | the things network | open LoRaWAN™ network
-
-
-
-
-
-
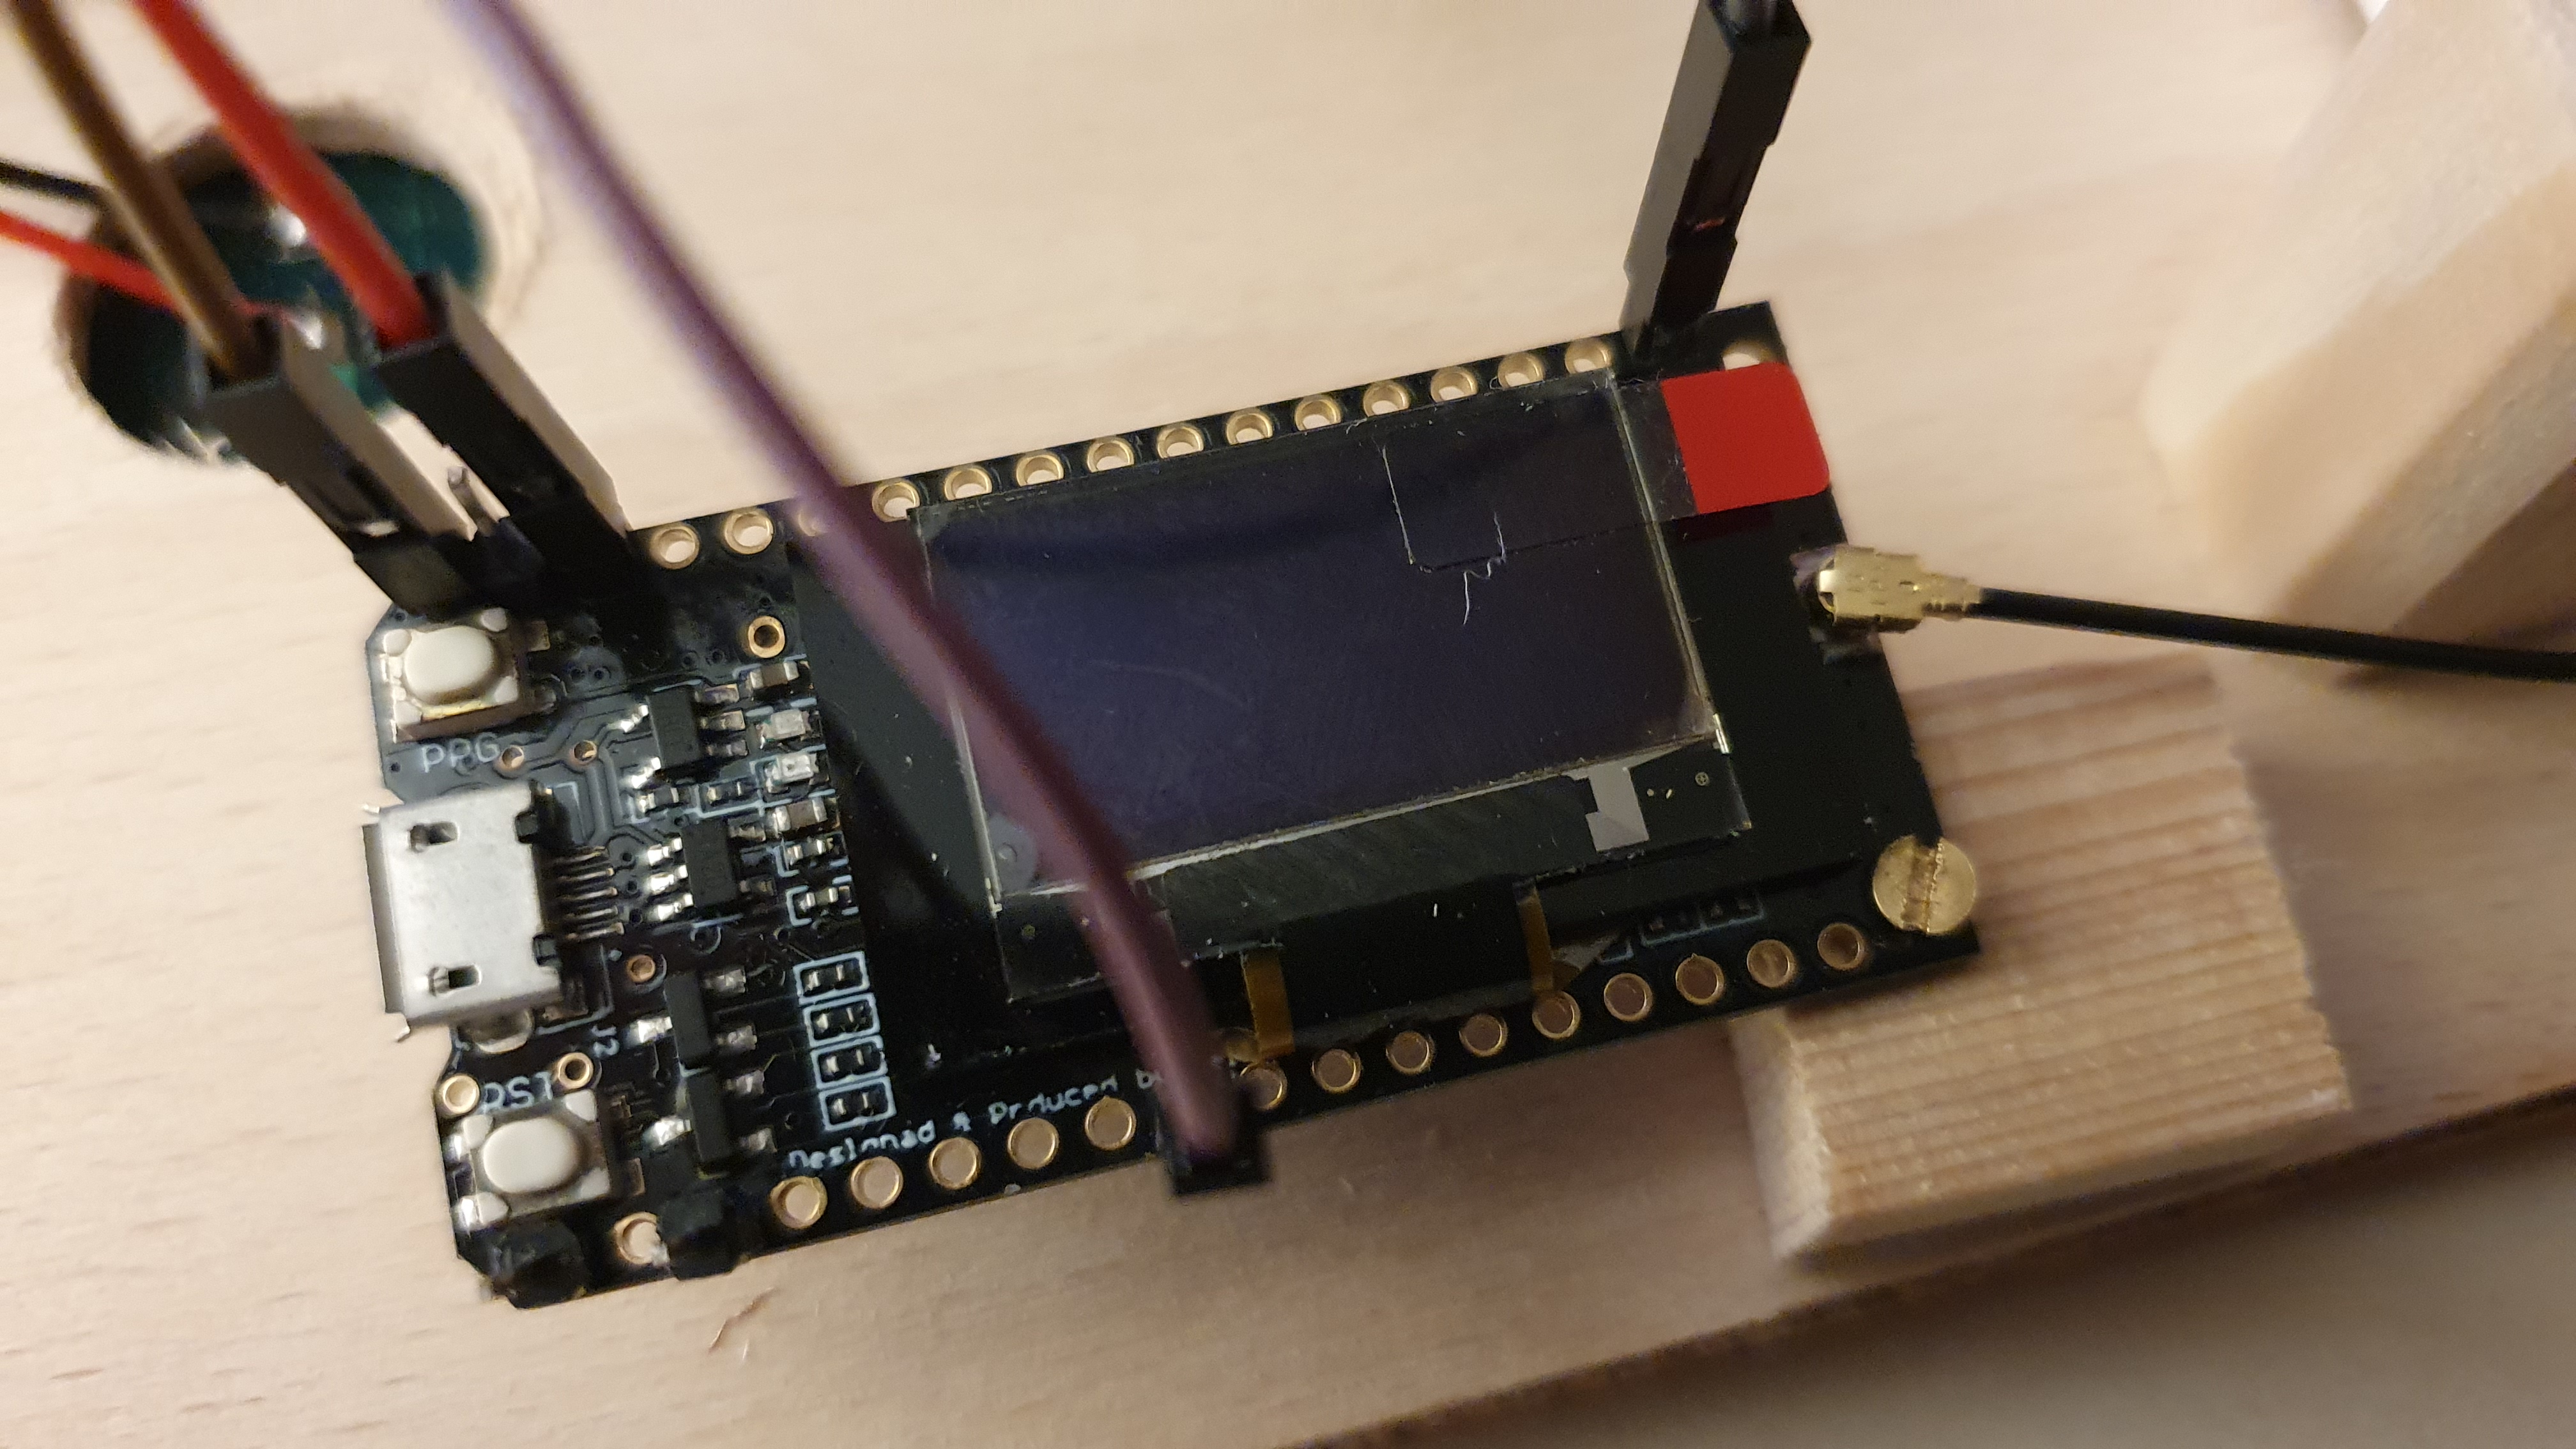
Used Parts:
- TTGO LORA32 915Mhz ESP32 LoRa OLED 0.96 Inch Blue Display
- 868MHz W868-ZT100 Stabantenne mit geradem Kopf Stabantenne 2.15 DBI SMA
-
-
Bilder:
Documentation:
-
-
-
Quellen/Source:
- Github | Xinyuan-LilyGO - TTGO-LoRa-Series
- www.thethingsnetwork.org | Code example - esp32-sx127 lora
-
-
-
- Add a comment
Subcategories
Router Article Count: 19
Switch Article Count: 1
NAS / SAN Article Count: 4
Gadgets Article Count: 33
Gadget (englisch für Apparat, technische Spielerei oder auch Schnickschnack) bezeichnet ein technisches Werkzeug oder Gerät mit bisher so nicht bekannter Funktionalität und/oder besonderem Design. Es ist traditionellerweise klein und handlich und zum Mitführen konzipiert. Eine große Rolle spielt der Spaßfaktor eines Gadgets: Geräte, die sich als Gadget definieren, sind oft Grenzgänger zwischen sinnvoller Funktionalität und Verspieltheit.Der Duden definiert Gadget als „kleiner, raffinierter technischer Gegenstand“.
DCIM Article Count: 10
iot Article Count: 117
- Anker 575 USB-C Docking Station (13-in-1), 85W für Laptops
- Perfect Server Hardware for Virtualization | Proxmox | pve-05
- Pioneer Blu-Ray/BD/DVD/CD Reader/writer USB 3.0 BDR-XD07TB | WORKS OK with Debian 11
- NOT WORKING WITH DEBIAN 11 | Dockingstation | IcyBox 14-in-1 USB Type-C | IB-DK2262AC
- How to remove systemd services
- Laptop | Lenovo | Thinkpad E15 Gen3 AMD
- Laptop | Lenovo | LENOVO-IDEA IdeaPad 3 15IGL05 Notebook (15.6 ", 128 GB SSD, Business Black)
- D. Klimo | Kent monoblocks
- TTN Mapper
- LILYGO TTGO T-Beam V1.1 ESP32 LoRa 868Mhz GPS 18650 Board
- LILYGO® TTGO T-Beam 868MHz -> The Things Network (TTN/TTS) -> Karte | Infos und Video bei Alex (www.aeq-web.com)
- Kabelfarben 3.3V, 5V, 12V, 230V | Durchmesser
- 01 Digi-Bee Stand01 Wetter
- Solar Panel | 6V 3W Solar Panel JY D145x145
- TTGO LoRa32 V2.1_1.6 version 433/868/915Mhz ESP32 LoRa OLED 0.96 Inch SD Card Bluetooth WIFI wireless Module ESP-32 SMA
- -pve-04 | Disk SSD and HDD
- DISK SSD | 1 TB | Samsung SSD 870 EVO 1TB - 1TB
- NanoVNA V2
- CubeSat | antennas |
- KoZo_GS3_433MHz
- tinyGS - shortcut what it means
- TinyGS Telegram community | published Links
- Wolfgang W. Osterhage (Springer Verlag Sachbuch 2021): Die Geschichte der Raumfahrt | (gefundene Fehler)
- ucs Univention some commands
- SMA-Stecker / SMA-Buchse
RSS Feed
Warning: Invalid argument supplied for foreach() in /var/www/clients/client2/web2/web/j/modules/mod_jw_srfr/helper.php on line 39
-
Cyberangriffe: Ex-BND-Chef fordert Hackbacks und Knacken von Kommunikation
Cyberangriffe: Ex-BND-Chef fordert Hackbacks und Knacken von Kommunikation
Nach der mutmaßlich russischen Spionage-Attacke auf die SPD verlangt der frühere BND-Chef Schindler deutlich mehr Überwachungsbefugnisse für die Geheimdienste.
Source: heise Security
Created on: 6.05.2024 | 19:35
heise Security | 6.05.2024 | 19:35 -
Trend Micro Antivirus One: Codeschmuggel im macOS-Scanner möglich
Trend Micro Antivirus One: Codeschmuggel im macOS-Scanner möglich
Trend Micros Antivirus One lässt sich durch eine Schwachstelle unter macOS beliebigen Code unterjubeln. Ein Update steht bereit.
Source: heise Security
Created on: 6.05.2024 | 14:09
heise Security | 6.05.2024 | 14:09 -
Trend Micro Antivirus One: Codeschmuggel im macOS-Scanner möglich
Trend Micro Antivirus One: Codeschmuggel im macOS-Scanner möglich
 Trend Micros Antivirus One lässt sich durch eine Schwachstelle unter macOS beliebigen Code unterjubeln. Ein Update steht bereit.
Source: Security-Alert Meldungen
Created on: 6.05.2024 | 14:09
Security-Alert Meldungen | 6.05.2024 | 14:09 -
Synaptics veröffentlicht DisplayLink 6.0 USB-Treiber für Linux
Synaptics veröffentlicht DisplayLink 6.0 USB-Treiber für Linux
Synaptics hat seinen auf Ubuntu-Installationen gemünzten Binärtreiber für die Unterstützung der DisplayLink USB-Grafikadapter veröffentlicht.
Source: Linux-Magazin
Created on: 6.05.2024 | 12:43
Linux-Magazin | 6.05.2024 | 12:43 -
Microsoft macht Sicherheit zur obersten Priorität
Microsoft macht Sicherheit zur obersten Priorität
Nachdem Microsoft Ende 2023 die Secure Future Initiative (SFI) ins Leben gerufen hat, um sich auf Cyberangriffen vorzubereiten, macht der Konzern nun laut dem Executive Vice President Microsoft…
Source: Linux-Magazin
Created on: 6.05.2024 | 09:33
Linux-Magazin | 6.05.2024 | 09:33 -
Sicherheitsupdates: Angreifer können IP-Telefone von Cisco ausspionieren
Sicherheitsupdates: Angreifer können IP-Telefone von Cisco ausspionieren
 Admins sollten zeitnah die abgesicherte Firmware für Ciscos IP-Telefone der Serien 6800, 7800 und 8800 installieren.
Source: Security-Alert Meldungen
Created on: 3.05.2024 | 09:21
Security-Alert Meldungen | 3.05.2024 | 09:21 -
Proxmox Backup Server 3.2 available
Proxmox Backup Server 3.2 available
Source: Announcements
Created on: 25.04.2024 | 14:51
Announcements | 25.04.2024 | 14:51 -
Proxmox VE 8.2 released!
Proxmox VE 8.2 released!
Source: Announcements
Created on: 24.04.2024 | 15:02
Announcements | 24.04.2024 | 15:02 -
OPNsense 23.7 released
OPNsense 23.7 released
This release marks a pivotal milestone in the platform's evolution, focusing on the significant migration of legacy components to the modern Model-View-Controller (MVC) framework, consequently augmenting API support for developers and integrators.Just as the roadrunner bird is known for its[…]
Source: Blog - OPNsense® is a true open source firewall and[…]
Created on: 31.07.2023 | 14:34
Blog - OPNsense® is a true open source firewall and[…] | 31.07.2023 | 14:34 -
OPNsense 23.1 released
OPNsense 23.1 released
Hi there, For more than 8 years now, OPNsense is driving innovation through modularising and hardening the open source firewall, with simple and reliable firmware upgrades, multi-language support, fast adoption of upstream software updates as well as clear and stable[…]
Source: Blog - OPNsense® is a true open source firewall and[…]
Created on: 26.01.2023 | 14:33
Blog - OPNsense® is a true open source firewall and[…] | 26.01.2023 | 14:33
neusten Links
Warning: count(): Parameter must be an array or an object that implements Countable in /var/www/clients/client2/web2/web/j/modules/mod_quicklistweblinks/helper.php on line 78
many More Links »
part of ...