Perfect
LXC | Monitoring Zabbix
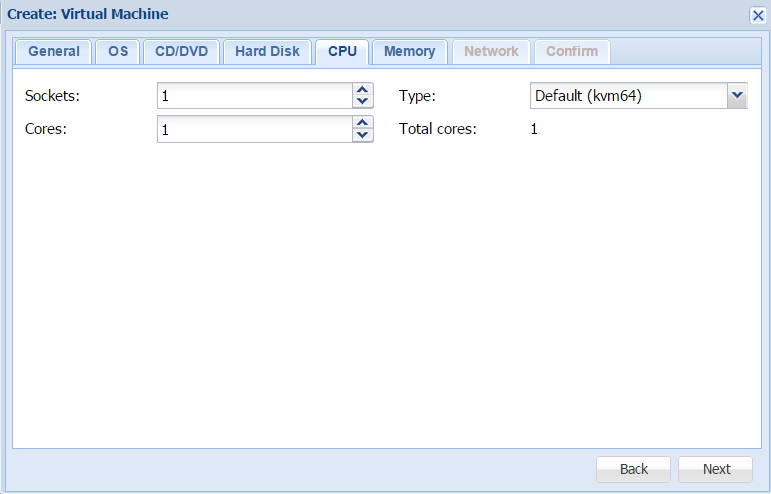
Debian LXC (Debian GNU/Linux 8 (jessie))
Disk 25GB
RAM 2 GB
| Remove Zabbix Client | apt purge --auto-remove zabbix-agent |
| # wget http://repo.zabbix.com/zabbix/3.0/debian/pool/main/z/zabbix-release/zabbix-release_3.0-1+jessie_all.deb # dpkg -i zabbix-release_3.0-1+trusty_all.deb # apt-get update |
| # apt-get install zabbix-server-mysql zabbix-frontend-php |
| # cd /usr/share/doc/zabbix-server-mysql # zcat create.sql.gz | mysql -uroot zabbix |
| # vi /etc/zabbix/zabbix_server.conf DBHost=localhost DBName=zabbix DBUser=zabbix DBPassword=zabbix |
| # service zabbix-server start |
| # vi /etc/apache2/conf-enabled/zabbix.conf |
| php_value max_execution_time 300 php_value memory_limit 128M php_value post_max_size 16M php_value upload_max_filesize 2M php_value max_input_time 300 php_value always_populate_raw_post_data -1 # php_value date.timezone Europe/Zurich |
| # service apache2 restart |
MONITOR JOOMLA FRONTEND LOGIN WITH ZABBIX
Source/Quellen:
- https://www.zabbix.com/documentation/3.2/manual/installation/install_from_packages
- http://www.zabbix.com/- http://lab4.org/wiki/Zabbix_Webfrontend_installieren
- https://www.phyramid.com/en/blog/monitoring-servers-at-phyramid/
- http://php.net/manual/de/timezones.europe.php
Add a comment
LXC | CUPS PrintServer
Install the cups, ghostscript, and gsfonts packages.
Source/Quellen:
- www.openprinting.org/printers
- wiki.debian.org/SystemPrinting
- fosskb.in/2012/12/31/printer-sharing-using-cups/
- lifeonubuntu.com/setting-up-cups-and-installing-local-printer-in-ubuntu-server/
- wiki.archlinux.org/index.php/CUPS
- www.cups.org/
- www.makeuseof.com/tag/make-wireless-printer-raspberry-pi/
- wiki.samba.org/index.php/Setup_a_Samba_print_server
-
-
-
-
-
- Add a comment
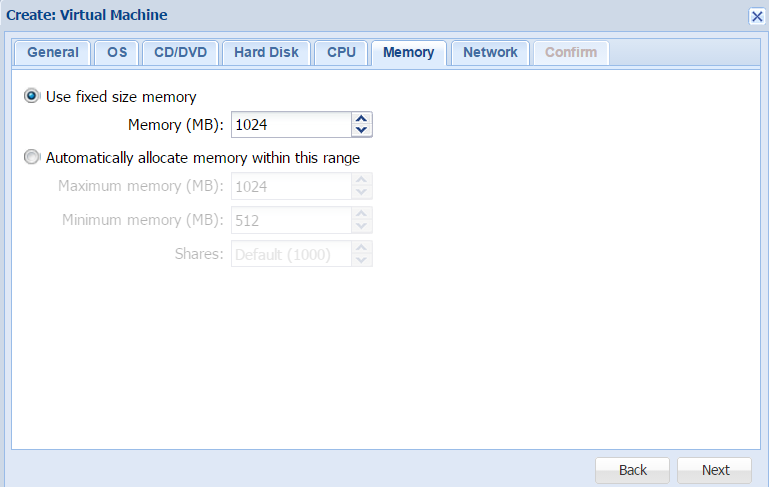
VM (Absolute minimum, you may need to scale-up as usage increases)
1 x vCPU
1024 MB RAM
10 GB HDD Storage
apt install -y freeradius |
|||
vi /etc/freeradius/3.0/clients.conf |
|||
| vi /etc/freeradius/3.0/users | |||
| some changes to the log (start around line 257) i did change so i know all loged user | |||
| vi /etc/freeradius/3.0/radiusd.conf | |||
| 352 auth_badpass = yes 353 auth_goodpass = yes |
|||
| # systemctl status freeradius.service | |||
| # systemctl stop freeradius.service | |||
| # systemctl start freeradius.service | |||
| # systemctl restart freeradius.service | |||
| # journalctl -xe | |||
| # freeradius -v | |||
| radiusd: FreeRADIUS Version 3.0.12, for host x86_64-pc-linux-gnu, built on Aug 10 2017 at 07:05:06 FreeRADIUS Version 3.0.12 |
|||
| # multitail /var/log/freeradius/radius.log |
| adding a second client | Process: 722 ExecStartPre=/usr/sbin/freeradius $FREERADIUS_OPTIONS -Cxm -lstdout (code=exited, status=1/FAILURE) Aug 22 07:13:33 radius-01 systemd[1]: freeradius.service: Control process exited, code=exited status=1 Aug 22 07:13:33 radius-01 systemd[1]: Failed to start FreeRADIUS multi-protocol policy server. Aug 22 07:13:33 radius-01 systemd[1]: freeradius.service: Unit entered failed state. Aug 22 07:13:33 radius-01 systemd[1]: freeradius.service: Failed with result 'exit-code'. |
Stackoverflow |
---
Quellen/Source:
Add a comment
KVM mit PXE / DHCP / TFTP
TFTP (tftpd-hpa)
| apt install tftpd-hpa |
ich musste unter
| vi /etc/inetd.conf |
den tftp auskomentieren # weil sonst der Port UDP/69 blockiert war
DHCP
vi /etc/dhcp/dhcpd.conf |
| cat /var/lib/dhcp/dhcpd.leases |
service isc-dhcp-server restart
service isc-dhcp-server start
service isc-dhcp-server stop
shows the used IP
grep "^lease" /var/lib/dhcp/dhcpd.leases |sort |uniq |wc -l
or
egrep "lease|hostname|hardware|\}" /var/lib/dhcp/dhcpd.leases
or
dhcp-lease-list /var/lib/dhcp/dhcpd.leases
PXE
Quellen/Source:
- www.debian-administration.org
- gparted.org over PXE
- isc-dhcp-server
-
-
-
-
-
wiki.debian.org/BOINC
boinc.berkeley.edu/wiki/Installing_BOINC_on_Debian#Links
# apt install boinc-client
# apt install boinc-manager
for CLI installation, run
# boinccmd
IRC: #debian-boinc on irc.debian.org
munin: https://github.com/munin-monitoring/contrib/tree/master/plugins/boinc
boincstats.com/en/bam/boincstatsSettings/

to use a bit of CPU do - KVM mit BOINC
the Goal is to reach a KVM Server with IPv6
Add a commentKVM with Graylog
Memory: 4GB
Hard Disk: 250GB
IOS: Debian 9
Hostname graylog-01
IP 10.147.42.40
build a homepage for photographer (CMS, Foto)
Quellen / Source:
- lychee
- koken works nice with Lightroom
- zenphoto
- piwigo
- galleryproject but closed sinc 2014
- Coppermine Photo Gallery
- 4homepages
- format.com $$$
-
-
-
Desktop Software
- lightzoneproject.org
- rawtherapee.com
- Capture One
- darktable.org
-
-
-
Add a comment
| Debian 9 (Stretch) , Installation on a Proxmox KVM Server | Debian 8 on a LXC Contaner |
|
just select apt install -y vim-nox To enable SSH login for a root user on Debian Linux system you need to first configure SSH server. Open /etc/ssh/sshd_config and change the following line: remove the #
|
first with nano /etc/ssh/sshd_config
# reboot
an Login with Traterm |
|
# apt full-upgrade # apt update -y && apt upgrade -y && apt autoremove # apt install vim-nox -y echo set number >> ~/.vimrc echo syntax on >> ~/.vimrc dpkg-reconfigure tzdata echo This email address is being protected from spambots. You need JavaScript enabled to view it. >> ~/.forward |
|
| vi /etc/network/interfaces auto eth0 iface eth0 inet static address 10.147.42.70 netmask 255.255.255.0 gateway 10.147.42.1 |
die IP Adresse wir im Proxmox GUI direkt bei der Herstellung des LXC angegeben | |
| sudo apt-get install debsecan | ||
| man debsecan | man Page | |
| 'pkg audit -F' | for freebsd |
Once you made the above change restart your SSH server:
# /etc/init.d/ssh restart
[ ok ] Restarting ssh (via systemctl): ssh.service.
Add then Munin-Node and Munin-Plugin
und ein Paar Tools für Analysen oder Messen der Auslastung
| iftop – Network Bandwidth Monitoring | apt-get install iftop | iftop |
| IPTraf– Real Time IP LAN Monitoring | apt-get install iptraf | iptraf |
| Htop– Linux Process Monitoring | apt-get install htop | htop |
-
-
-
-
Add a comment
LXC | openLdap with GOsa2
Debian 8
RAM 1GB
HD 25GB
Infos GOsa2: oss.gonicus.de/
Infos openLDAP: www.openldap.org/
Proxmox KVM openBSD pfSense NAT
Proxmox Version: proxmox-ve-2.6.32: 3.3-143 (running kernel: 2.6.32-35-pve)
Pfsense Version: 2.2
First Download the file and unzip it to get the ISO file
Upload the file to your Proxmox Server
In Proxmox Create a VM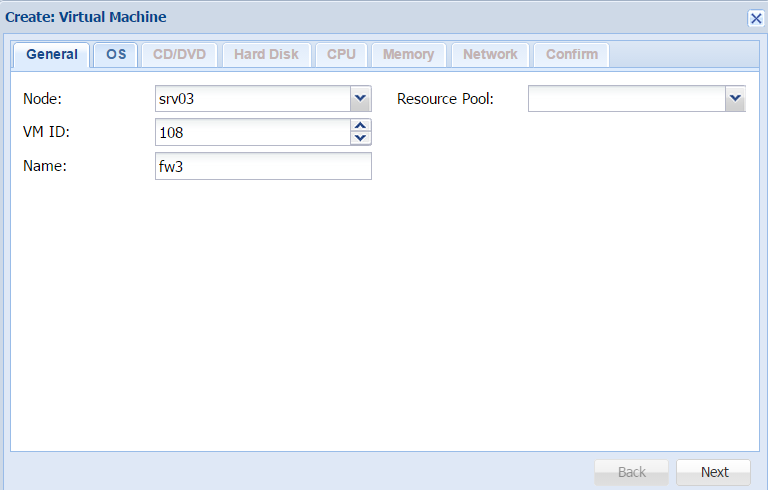
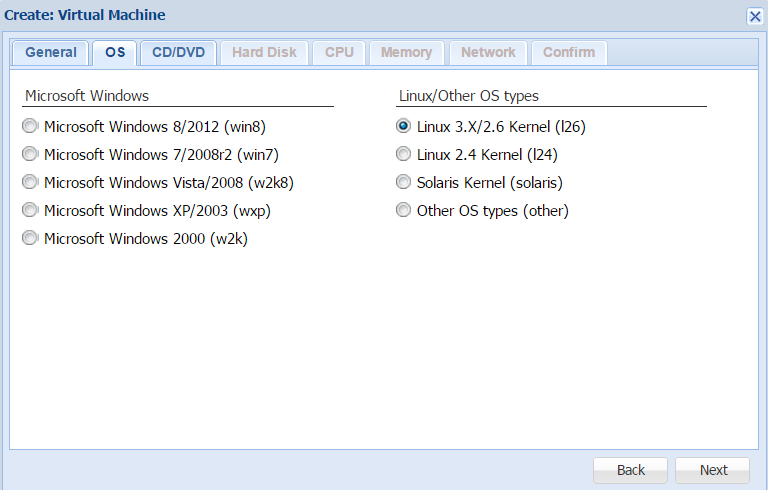
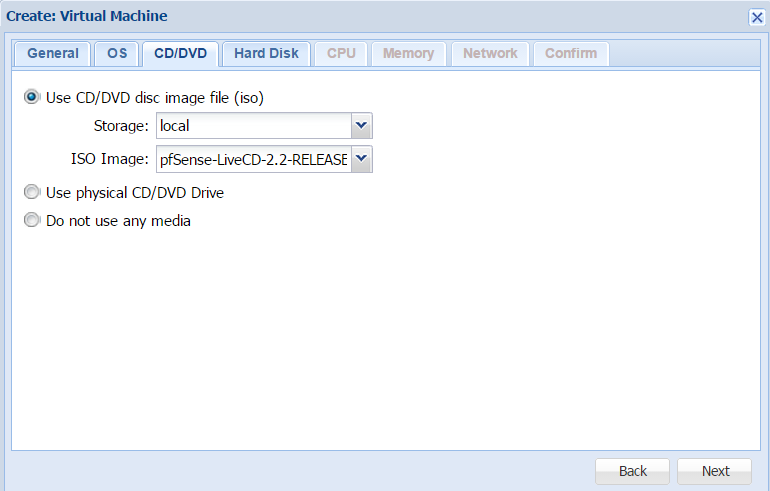

Important before you start the Virtual Server you have to add a second Network which you have defined before in Proxmox Network

Proxmox KVM Server
Win 8 update auf Win 8.1
2GB - 4GB RAM (2048/4096MB)
126 GB Harddisk space
virtio-win-0.1-94.iso Download
wie wurde Installiert? Gemäss Doku
ab und zu gibt es errors
| BAD_POOL_HEADER | ||
| MEMORY_MANAGEMENT | ||
| and someting wiht sql ? |
Subcategories
Monitoring Article Count: 69
Roundcube Article Count: 1
Kolab News Article Count: 33
soho Net Article Count: 4
Perfect NAS Article Count: 28
Perfect Server Article Count: 80
Perfect Router/FW/Switch Article Count: 4
- Anker 575 USB-C Docking Station (13-in-1), 85W für Laptops
- Perfect Server Hardware for Virtualization | Proxmox | pve-05
- Pioneer Blu-Ray/BD/DVD/CD Reader/writer USB 3.0 BDR-XD07TB | WORKS OK with Debian 11
- NOT WORKING WITH DEBIAN 11 | Dockingstation | IcyBox 14-in-1 USB Type-C | IB-DK2262AC
- How to remove systemd services
- Laptop | Lenovo | Thinkpad E15 Gen3 AMD
- Laptop | Lenovo | LENOVO-IDEA IdeaPad 3 15IGL05 Notebook (15.6 ", 128 GB SSD, Business Black)
- D. Klimo | Kent monoblocks
- TTN Mapper
- LILYGO TTGO T-Beam V1.1 ESP32 LoRa 868Mhz GPS 18650 Board
- LILYGO® TTGO T-Beam 868MHz -> The Things Network (TTN/TTS) -> Karte | Infos und Video bei Alex (www.aeq-web.com)
- Kabelfarben 3.3V, 5V, 12V, 230V | Durchmesser
- 01 Digi-Bee Stand01 Wetter
- Solar Panel | 6V 3W Solar Panel JY D145x145
- TTGO LoRa32 V2.1_1.6 version 433/868/915Mhz ESP32 LoRa OLED 0.96 Inch SD Card Bluetooth WIFI wireless Module ESP-32 SMA
- -pve-04 | Disk SSD and HDD
- DISK SSD | 1 TB | Samsung SSD 870 EVO 1TB - 1TB
- NanoVNA V2
- CubeSat | antennas |
- KoZo_GS3_433MHz
- tinyGS - shortcut what it means
- TinyGS Telegram community | published Links
- Wolfgang W. Osterhage (Springer Verlag Sachbuch 2021): Die Geschichte der Raumfahrt | (gefundene Fehler)
- ucs Univention some commands
- SMA-Stecker / SMA-Buchse
RSS Feed
Warning: file_get_contents(https://www.bsi.bund.de/SiteGlobals/Functions/RSSFeed/RSSNewsfeed/RSSNewsfeed_WID.xml): failed to open stream: HTTP request failed! HTTP/1.1 404 Not Found in /var/www/clients/client2/web2/web/j/modules/mod_jw_srfr/helper.php on line 273
Warning: file_get_contents(https://www.bsi.bund.de/SiteGlobals/Functions/RSSFeed/RSSNewsfessBSIFB/RSSNewsfeed_BuergerCERT.xml): failed to open stream: HTTP request failed! HTTP/1.1 404 Not Found in /var/www/clients/client2/web2/web/j/modules/mod_jw_srfr/helper.php on line 273
Warning: file_get_contents(): php_network_getaddresses: getaddrinfo failed: Name or service not known in /var/www/clients/client2/web2/web/j/modules/mod_jw_srfr/helper.php on line 273
Warning: file_get_contents(http://feeds.joomla.org/JoomlaAnnouncements): failed to open stream: php_network_getaddresses: getaddrinfo failed: Name or service not known in /var/www/clients/client2/web2/web/j/modules/mod_jw_srfr/helper.php on line 273
Warning: file_get_contents(): php_network_getaddresses: getaddrinfo failed: Name or service not known in /var/www/clients/client2/web2/web/j/modules/mod_jw_srfr/helper.php on line 273
Warning: file_get_contents(http://feeds.joomla.org/JoomlaSecurityNews): failed to open stream: php_network_getaddresses: getaddrinfo failed: Name or service not known in /var/www/clients/client2/web2/web/j/modules/mod_jw_srfr/helper.php on line 273
Warning: Invalid argument supplied for foreach() in /var/www/clients/client2/web2/web/j/modules/mod_jw_srfr/helper.php on line 39
Warning: Invalid argument supplied for foreach() in /var/www/clients/client2/web2/web/j/modules/mod_jw_srfr/helper.php on line 39
-
Cisco Catalyst SD-WAN Manager Vulnerabilities
Cisco Catalyst SD-WAN Manager Vulnerabilities
Multiple vulnerabilities in Cisco Catalyst SD-WAN Manager, formerly SD-WAN vManage, could allow a remote attacker to gain access to sensitive information, elevate privileges, or gain unauthorized access to the application. For more information about these vulnerabilities, see the Details section of[…]
Source: Cisco Security Advisory
Created on: 14.05.2026 | 16:00
Cisco Security Advisory | 14.05.2026 | 16:00 -
Cisco Catalyst SD-WAN Controller Authentication Bypass Vulnerability
Cisco Catalyst SD-WAN Controller Authentication Bypass Vulnerability
May 2026: This security advisory provides the details and fix information for a vulnerability that was discovered and fixed after the Cisco Catalyst SD-WAN Controller Authentication Bypass Vulnerability was disclosed in February 2026. This new advisory is for a new[…]
Source: Cisco Security Advisory
Created on: 14.05.2026 | 16:00
Cisco Security Advisory | 14.05.2026 | 16:00 -
Foxconn-Werke in Nordamerika von Ransomware-Gruppe Nitrogen angegriffen
Foxconn-Werke in Nordamerika von Ransomware-Gruppe Nitrogen angegriffen
 Der Auftragsfertiger bestätigt den Cyberangriff. Nitrogen prahlt damit, 11 Millionen Dateien zu Apple, Nvidia und weiteren Kunden gestohlen haben.
Source: heise security News
Created on: 14.05.2026 | 13:12
heise security News | 14.05.2026 | 13:12 -
Angeblich Malware: macOS wirft ChatGPT mitunter in den Papierkorb
Angeblich Malware: macOS wirft ChatGPT mitunter in den Papierkorb
 Ältere Versionen von ChatGPT und Codex lassen sich in macOS nicht mehr starten, die Malware-Warnung erscheint. Grund ist wohl ein Sicherheitsvorfall bei OpenAI.
Source: heise security News
Created on: 13.05.2026 | 19:31
heise security News | 13.05.2026 | 19:31 -
KDE-Projekt erhält 1,2 Millionen Euro vom Sovereign Tech Fund
KDE-Projekt erhält 1,2 Millionen Euro vom Sovereign Tech Fund
Exakt 1.285.200 Euro erhält das KDE-Projekt in diesem und nächsten Jahr aus dem Sovereign Tech Fund – und somit aus deutschen Steuermitteln.
Source: Linux-Magazin
Created on: 13.05.2026 | 18:16
Linux-Magazin | 13.05.2026 | 18:16 -
Unraid 7.3 bringt Internal Boot und kritische Security-Updates
Unraid 7.3 bringt Internal Boot und kritische Security-Updates
Die neu erschienene Version 7.3.0 des NAS-Betriebssystems erlaubt nun die Installation von internen Datenträgern und behebt die kritischen Sicherheitslücken Copy Fail und Dirty Frag.
Source: Linux-Magazin
Created on: 13.05.2026 | 16:25
Linux-Magazin | 13.05.2026 | 16:25 -
Fortinet stopft elf Sicherheitslücken in mehreren Produkten
Fortinet stopft elf Sicherheitslücken in mehreren Produkten
 Fortinet hat zum „Patch-Dienstag“ elf Sicherheitsflicken konzertiert veröffentlicht. Zwei der Lecks gelten als kritisch.
Source: heise security Alerts
Created on: 13.05.2026 | 11:54
heise security Alerts | 13.05.2026 | 11:54 -
Patchday: Adobe schließt mehr als 50 Lücken in After Effects & Co.
Patchday: Adobe schließt mehr als 50 Lücken in After Effects & Co.
 Wichtige Sicherheitsupdates reparieren diverse Adobe-Anwendungen. Bislang gibt es keine Berichte zu laufenden Attacken.
Source: heise security Alerts
Created on: 13.05.2026 | 10:04
heise security Alerts | 13.05.2026 | 10:04 -
Proxmox Backup Server 4.2 released!
Proxmox Backup Server 4.2 released!
Source: Announcements
Created on: 29.04.2026 | 14:26
Announcements | 29.04.2026 | 14:26 -
New Archive CDN for End-of-Life (EOL) Releases
New Archive CDN for End-of-Life (EOL) Releases
Source: Announcements
Created on: 9.01.2026 | 18:43
Announcements | 9.01.2026 | 18:43
neusten Links
Warning: count(): Parameter must be an array or an object that implements Countable in /var/www/clients/client2/web2/web/j/modules/mod_quicklistweblinks/helper.php on line 78
many More Links »
part of ...