Hardware Information
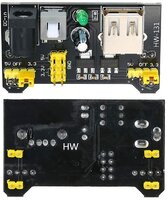
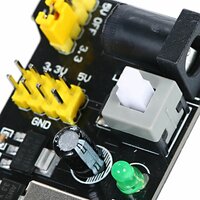
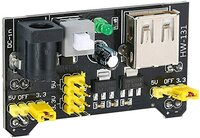
Das HW131 ist ein 3,3 V/5 V MB102 Breadboard-Netzteilmodul, das über zwei 5-V- und 3,3-V-Stromschienen verfügt und eine Mehrzweck-USB-Buchse besitzt.
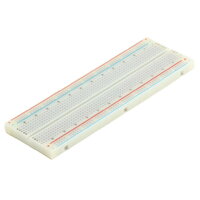
Das Netzteilmodul passt sicher in ein standardmäßiges 400 Pin oder 800 Pin-Breadboard. Es verfügt über einen Verpolungsschutz.
Das Modul kann einen Eingang von 6,5 bis 12 V aufnehmen und 3,3 V und + 5 V erzeugen.
Das Modul kann auch 5V am USB-Anschluss oder über den USB-Anschluss ausgeben.
Es ist ein Muss für Maker, die elektronische Schaltkreise auf dem Steckbrett testen.
Spezifikationen:
- Eingangsspannung: 6,5-12V (DC-Netzteil (nicht im Lieferumfang)) oder mit USB Stromversorgung
- Ausgangsspannung: 3,3V / 5V schaltbar
- Ausgangsstrom: <= 700 mA
- unabhängige Steuerung auf oberer und unterer Stromschiene, umschaltbar auf 0V, 3,3V, 5V
- Zwei Anschlüsse zu jeweils 3,3V und 5V DC Ausgangspins sind auf der Platine montiert, um ein einfaches externes Herausführen zu ermöglichen.
- Die weiße Taste ist der Hauptschalter des Power Moduls.
- Dimensionen: 53mm x 32mm x 25mm
- Gewicht: 12g
a b c d Add a comment
|
problem with WLAN connection # c |
1 ping -c4 10.18.23.1 > /dev/null 2 3 if [ $? != 0 ] 4 then 5 echo "No network connection, restarting wlan0" 6 /sbin/ifdown 'wlan0' 7 sleep 5 8 /sbin/ifup --force 'wlan0' 9 fi |
--> Link |
|
For the ersten boot
|
Code: /etc/wpa_supplicant/wpa_supplicant.conf
|
Raspberry Pi 4 (Debain10 | Buster) / Toolchain ESP32
Basic Goal: have a Raspberry Pi 4, with Desktop, Arduino iDE (v 1.8.9) Installed then in the Arduino IDE go to Tools - Boards --> Board Manager then Search for ESP32 you will find [esp32 by Espressif Systems] install it.
| docs.espressif.com | |||
| Setup Linux Toolchain from Scratch | |||
| Login as Pi | # sudo -i | ||
| Install Prerequisites | # apt install -y gcc git wget make libncurses-dev flex bison gperf python python-pip python-setuptools python-serial python-cryptography python-future python-pyparsing | ||
| Compile the Toolchain from Source | # apt install -y gawk gperf grep gettext libncurses-dev python python-dev automake bison flex texinfo help2man libtool libtool-bin | ||
| Create the working directory and go into it: | # mkdir -p ~/esp # cd ~/esp |
||
| gcc 8 will be installed but we need gcc 6 to compile | |||
| To check gcc version: | # gcc -v | ||
| To install gcc version 6: | # apt install -y g++-6 gcc-6 | ||
| To switch between gcc6 and gcc8: | # update-alternatives --install /usr/bin/gcc gcc /usr/bin/gcc-8 1 --slave /usr/bin/g++ g++ /usr/bin/g++-8 # update-alternatives --install /usr/bin/gcc gcc /usr/bin/gcc-6 2 --slave /usr/bin/g++ g++ /usr/bin/g++-6 # update-alternatives --config gcc |
||
| Download crosstool-NG and build it: | # git clone https://github.com/espressif/crosstool-NG.git # cd crosstool-NG |
||
| Important Bash 5 have to been accepted | # vi configure.ac | ||
| around line 193 add |5 | |$EGREP '^GNU bash, version (3\.[1-9]|4|5)') | ||
| save and Quit | |||
| # ./bootstrap && ./configure --enable-local && make install | |||
| then Quit sudo with | # exit | ||
| Build the toolchain: | # ./ct-ng xtensa-esp32-elf | ||
| # ./ct-ng build | |||
| chmod -R u+w builds/xtensa-esp32-elf | |||
| # cd /root | |||
| there should be a esp32 directory | # ls -alth | ||
| # cp esp32 -r --parents /home/pi/.arduino15/packages/ | |||
| github | espressif/arduino-esp32 | Installation instructions for Debian / Ubuntu OS | |||
| first know wehre your /Arduino/hardware is | # find / -xdev -name hardware | ||
| cd ~/Arduino/hardware mkdir -p espressif && \ cd espressif && \ git clone https://github.com/espressif/arduino-esp32.git esp32 && \ cd esp32 && \ git submodule update --init --recursive && \ cd tools && \ python3 get.py |
|||
| then copied the xtensa-esp32-elf directory (located in builds directory) over to /home/pi/Arduino/hardware/espressif/esp32/tools/ using copy and paste in the file browsers. |
|||
a
QUellen/Source:
- docs.espressif.com/projects/esp-idf/en/v3.2.2/get-started/linux-setup-scratch.html
- github | espressif/arduino-esp32 | Installation instructions for Debian / Ubuntu OS
-
-
- Add a comment
Bilder:
Documentation:
-
-
-
Quellen/Source:
- www.banggood.com
-
-
- Add a comment
Quellen/Source:
-
- Monitoring Temperature and Humidity Using InfluxDb and Grafana on Raspberry Pi
- Andreas Spiess | #255 Node-Red, InfluxDB, and Grafana Tutorial on a Raspberry Pi
-
-
-
-
-
- Add a comment
Subcategories
Router Article Count: 19
Switch Article Count: 1
NAS / SAN Article Count: 4
Gadgets Article Count: 33
Gadget (englisch für Apparat, technische Spielerei oder auch Schnickschnack) bezeichnet ein technisches Werkzeug oder Gerät mit bisher so nicht bekannter Funktionalität und/oder besonderem Design. Es ist traditionellerweise klein und handlich und zum Mitführen konzipiert. Eine große Rolle spielt der Spaßfaktor eines Gadgets: Geräte, die sich als Gadget definieren, sind oft Grenzgänger zwischen sinnvoller Funktionalität und Verspieltheit.Der Duden definiert Gadget als „kleiner, raffinierter technischer Gegenstand“.
DCIM Article Count: 10
iot Article Count: 117
- Anker 575 USB-C Docking Station (13-in-1), 85W für Laptops
- Perfect Server Hardware for Virtualization | Proxmox | pve-05
- Pioneer Blu-Ray/BD/DVD/CD Reader/writer USB 3.0 BDR-XD07TB | WORKS OK with Debian 11
- NOT WORKING WITH DEBIAN 11 | Dockingstation | IcyBox 14-in-1 USB Type-C | IB-DK2262AC
- How to remove systemd services
- Laptop | Lenovo | Thinkpad E15 Gen3 AMD
- Laptop | Lenovo | LENOVO-IDEA IdeaPad 3 15IGL05 Notebook (15.6 ", 128 GB SSD, Business Black)
- D. Klimo | Kent monoblocks
- TTN Mapper
- LILYGO TTGO T-Beam V1.1 ESP32 LoRa 868Mhz GPS 18650 Board
- LILYGO® TTGO T-Beam 868MHz -> The Things Network (TTN/TTS) -> Karte | Infos und Video bei Alex (www.aeq-web.com)
- Kabelfarben 3.3V, 5V, 12V, 230V | Durchmesser
- 01 Digi-Bee Stand01 Wetter
- Solar Panel | 6V 3W Solar Panel JY D145x145
- TTGO LoRa32 V2.1_1.6 version 433/868/915Mhz ESP32 LoRa OLED 0.96 Inch SD Card Bluetooth WIFI wireless Module ESP-32 SMA
- -pve-04 | Disk SSD and HDD
- DISK SSD | 1 TB | Samsung SSD 870 EVO 1TB - 1TB
- NanoVNA V2
- CubeSat | antennas |
- KoZo_GS3_433MHz
- tinyGS - shortcut what it means
- TinyGS Telegram community | published Links
- Wolfgang W. Osterhage (Springer Verlag Sachbuch 2021): Die Geschichte der Raumfahrt | (gefundene Fehler)
- ucs Univention some commands
- SMA-Stecker / SMA-Buchse


 Im beliebten Werkzeug zur Erstellung von No-Code-Arbeitsabläufen klaffen gleich vier kritische Lücken, eine mit Höchstwertung. Admins sollten schnell patchen.
 Ermittlern gelang in Spanien ein empfindlicher Schlag gegen die als „Black Axe“ bekannte nigerianische Cyber-Mafia.
 Die Version 3.0.23 des VLC Media Player bessert diverse Schwachstellen aus, die möglicherweise Unterschieben von Schadcode erlauben.


