Hardware
-
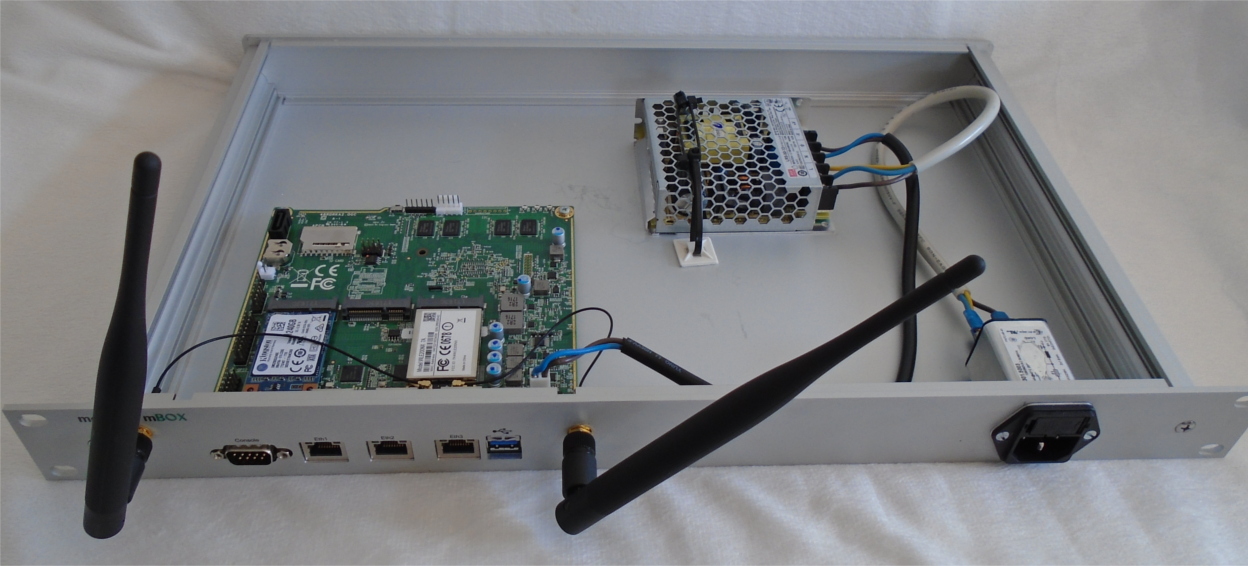
apu2c4 / 4 GB DDR3-1333 DRAM / WLAN wle200nx / 240GB mSATA Kingston
List of the Hardware --> Firewall | Hardware
LAN Design
-
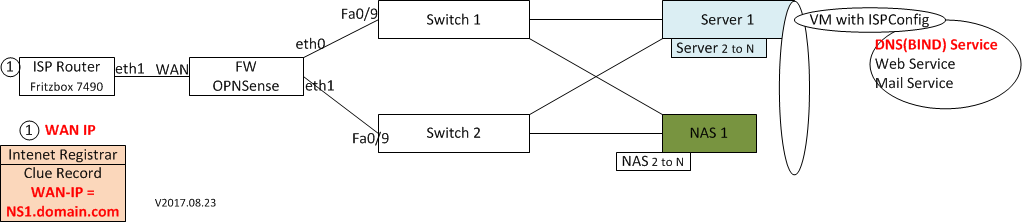 where one the design
 FW/opnSense = apu2c4
WAN = Eth1
eth0 = Eth2
eth1 = eth3 (but later) IP Range / VLAN Design
-
List of IP Range & VLAN --> Firewall | IP & VLAN
Setup Hardware
-
Alle Teile zusammenschrauben und löten.
Install opnSense
-
Link: PC Engine howto - OS Installation - opnsense
Download opnSense
EtcherSteps: - download the latest serial amd64 installer for OPNSense (e.g. OPNsense-17.7-OpenSSL-serial-amd64.img.bz2)
- Write image to an USB stick using Etcher (Etcher is a graphical writing tool for Mac OS, Linux and Windows)
- boot apu2 from USB with installed mSATA/SD
- follow the instructions of the installer
Important: the SD slot on the apu2 boards is directly connected to the CPU and needs the module SDHCI to work.
Do not use an SD to boot FreeBSD based OS like pfSense and OPNSense on apu2 boards. Only very recent kernel versions fully support booting via SDHCI.
Try an USB-SD adapter in case of related troubles. If it works with the USB-SD adapter, but not in the SD slot, then the SDHCI module is missing ...Installation Steps
The installation process involves a few simple steps.
Note
To invoke the installer login with user installer and password opnsenseTip
The installer can also be started from the network using ssh, default ip address is 192.168.1.1- Configure console - The default configuration should be fine for most occasions.
- Select task - The Quick/Easy Install option should be fine for most occasions. For installations on embedded systems or systems with minimal diskspace choose Custom Installation and do not create a swap slice. Continue with default settings.
- Are you SURE? - When proceeding OPNsense will be installed on the first hard disk in the system.
- Reboot - The system is now installed and needs to be rebooted to continue with configuration.
opnSense Installation Problems: - Not Booting from the USB Stick
basic opnSense configuration
-
my config:
libre SSL GUI |System⇒Settings⇒General Install OpenSSL & LibreSSL system, Firmware, Settings System update GUI | via System⇒Firmware clamAV Plugin install clamAV
Source/Quellen/Infos:
- OPNSense hinter FB 6490 Cable
-
-
- opnSense define IP Range & VLAN
-
-
- opnSense WLAN
-
- opnSense Unifi Controller | Unifi how to Install...
- opnsense WIFI setup
- opnSense Conect Server in DMZ
-
-
- opnSense Conect VPN / IPSec
-
-
-
- Anker 575 USB-C Docking Station (13-in-1), 85W für Laptops
- Perfect Server Hardware for Virtualization | Proxmox | pve-05
- Pioneer Blu-Ray/BD/DVD/CD Reader/writer USB 3.0 BDR-XD07TB | WORKS OK with Debian 11
- NOT WORKING WITH DEBIAN 11 | Dockingstation | IcyBox 14-in-1 USB Type-C | IB-DK2262AC
- How to remove systemd services
- Laptop | Lenovo | Thinkpad E15 Gen3 AMD
- Laptop | Lenovo | LENOVO-IDEA IdeaPad 3 15IGL05 Notebook (15.6 ", 128 GB SSD, Business Black)
- D. Klimo | Kent monoblocks
- TTN Mapper
- LILYGO TTGO T-Beam V1.1 ESP32 LoRa 868Mhz GPS 18650 Board
- LILYGO® TTGO T-Beam 868MHz -> The Things Network (TTN/TTS) -> Karte | Infos und Video bei Alex (www.aeq-web.com)
- Kabelfarben 3.3V, 5V, 12V, 230V | Durchmesser
- 01 Digi-Bee Stand01 Wetter
- Solar Panel | 6V 3W Solar Panel JY D145x145
- TTGO LoRa32 V2.1_1.6 version 433/868/915Mhz ESP32 LoRa OLED 0.96 Inch SD Card Bluetooth WIFI wireless Module ESP-32 SMA
- -pve-04 | Disk SSD and HDD
- DISK SSD | 1 TB | Samsung SSD 870 EVO 1TB - 1TB
- NanoVNA V2
- CubeSat | antennas |
- KoZo_GS3_433MHz
- tinyGS - shortcut what it means
- TinyGS Telegram community | published Links
- Wolfgang W. Osterhage (Springer Verlag Sachbuch 2021): Die Geschichte der Raumfahrt | (gefundene Fehler)
- ucs Univention some commands
- SMA-Stecker / SMA-Buchse
RSS Feed
Warning: Invalid argument supplied for foreach() in /var/www/clients/client2/web2/web/j/modules/mod_jw_srfr/helper.php on line 39
Warning: Invalid argument supplied for foreach() in /var/www/clients/client2/web2/web/j/modules/mod_jw_srfr/helper.php on line 39
-
„CallPhantom“: Android-App liefert falsche Daten anstatt Anrufprotokolle
„CallPhantom“: Android-App liefert falsche Daten anstatt Anrufprotokolle
 Die Apps der „CallPhantom“-Kampagne versprechen, gegen Zahlung Anrufverlauf beliebiger Nummern zu liefern. Die Daten sind erfunden.
Source: heise security News
Created on: 7.05.2026 | 14:01
heise security News | 7.05.2026 | 14:01 -
Cyberkrieg: Medien zitieren Interna aus Russlands Geheimdienstausbildung
Cyberkrieg: Medien zitieren Interna aus Russlands Geheimdienstausbildung
 An einem Lehrstuhl einer Moskauer Universität lässt der Militärgeheimdienst GRU angeblich seinen Nachwuchs ausbilden. Mehrere Medien zitieren interne Dokumente.
Source: heise security News
Created on: 7.05.2026 | 12:27
heise security News | 7.05.2026 | 12:27 -
StarlingX 12.0 stellt sich breiter auf
StarlingX 12.0 stellt sich breiter auf
Die StarlingX-Community hat StarlingX 12.0 veröffentlicht.
Source: Linux-Magazin
Created on: 7.05.2026 | 12:09
Linux-Magazin | 7.05.2026 | 12:09 -
Node.js 25: Ausbrüche aus JavaScript-Sandbox vm2 vorstellbar
Node.js 25: Ausbrüche aus JavaScript-Sandbox vm2 vorstellbar
 Die Sandbox-Komponente vm2 der Open-Source-JavaScript-Laufzeitumgebung Node.js ist mit bestimmten Einstellungen verwundbar.
Source: heise security Alerts
Created on: 7.05.2026 | 11:02
heise security Alerts | 7.05.2026 | 11:02 -
Cisco: Codeschmuggel-Leck in Unity Connection und weitere Lücken
Cisco: Codeschmuggel-Leck in Unity Connection und weitere Lücken
 Cisco hat fast zwei Handvoll Sicherheitsupdates veröffentlicht. Sie schließen mehrere hochriskante Lücken etwa in Unity Connection.
Source: heise security Alerts
Created on: 7.05.2026 | 09:08
heise security Alerts | 7.05.2026 | 09:08 -
Incus 7.0.0 LTS erhält länger Support und streicht Altlasten
Incus 7.0.0 LTS erhält länger Support und streicht Altlasten
Der Manager für Container und virtuelle Maschinen liegt in einer neuen Version vor, die das Entwicklerteam besonders lange pflegen möchte.
Source: Linux-Magazin
Created on: 6.05.2026 | 18:32
Linux-Magazin | 6.05.2026 | 18:32 -
Cisco Enterprise Chat and Email Lite Agent File Upload Vulnerability
Cisco Enterprise Chat and Email Lite Agent File Upload Vulnerability
A vulnerability in the Lite Agent feature of Cisco Enterprise Chat and Email (ECE) could allow an authenticated, remote attacker to conduct browser-based attacks. To exploit this vulnerability, the attacker must have valid credentials for a user account with at[…]
Source: Cisco Security Advisory
Created on: 6.05.2026 | 16:00
Cisco Security Advisory | 6.05.2026 | 16:00 -
Cisco Unity Connection Remote Code Execution and Server-Side Request Forgery Vulnerabilities
Cisco Unity Connection Remote Code Execution and Server-Side Request Forgery Vulnerabilities
Multiple vulnerabilities in Cisco Unity Connection could allow a remote attacker to execute arbitrary code on or conduct server-side request forgery (SSRF) attacks through an affected device. For more information about these vulnerabilities, see the Details section of this advisory. Cisco[…]
Source: Cisco Security Advisory
Created on: 6.05.2026 | 16:00
Cisco Security Advisory | 6.05.2026 | 16:00 -
Proxmox Backup Server 4.2 released!
Proxmox Backup Server 4.2 released!
Source: Announcements
Created on: 29.04.2026 | 14:26
Announcements | 29.04.2026 | 14:26 -
New Archive CDN for End-of-Life (EOL) Releases
New Archive CDN for End-of-Life (EOL) Releases
Source: Announcements
Created on: 9.01.2026 | 18:43
Announcements | 9.01.2026 | 18:43
neusten Links
Warning: count(): Parameter must be an array or an object that implements Countable in /var/www/clients/client2/web2/web/j/modules/mod_quicklistweblinks/helper.php on line 78
many More Links »
part of ...